If you remember, a Thread is started in Java by calling the start() method of java.lang.Thread class, but if you learn more you will find out that start() method internally calls the run() method of Runnable interface to execute the code specified in the run() method in the separate thread. Now the question comes, why can't you just call the run() method instead of calling the start() method because anyway start() is calling the run()? This is one of the tricky multi-threading question you will find on Java interviews. The trick here is that, when you directly call the run() method than the code inside run() method will not be executed on a new thread, instead it will be executed on the same thread. On the other hand, when you call the Thread.start() method, then the code inside run() method will be executed on a new thread, which is actually created by the start() method. This is one of the fundamental of threading in Java, which is often get overlooked by Java developers unless you have read book like Java Threads By Scott Oaks, which explains every key multi-threading concept and thread basics in good detail.
Read more »
Monday, December 21, 2015

Sunday, December 20, 2015
How To Start Appium Node Server From Command Prompt
Earlier we learnt how to download and Install appium server In windows during THIS POST and THIS POST will show you how to launch appium from windows start menu and then how to start appium node server manually from appium Interface. It Is not compulsory to start appium software node server from Interface only to test android software app. You can start appium server from command prompt too. Bellow given steps will show you how to start appium node server from command prompt to automate android software app.
PREREQUISITE :
Set Path System Variable Of Node JS
Earlier we Installed Node JS software. Installation will create nodejs folder at C:\Program Files\ Path. We need to set this path(C:\Program Files\nodejs followed by ;(semicolon)) as system path variable as shown In bellow Image. View THIS POST to learn more about how to open Environment variable dialog and set Path variable.

Earlier we Installed Node JS software. Installation will create nodejs folder at C:\Program Files\ Path. We need to set this path(C:\Program Files\nodejs followed by ;(semicolon)) as system path variable as shown In bellow Image. View THIS POST to learn more about how to open Environment variable dialog and set Path variable.

Start Appium Node Server From Command Prompt
If you look at path C:\Program Files, There will be folder for Appium software which Is created during appium Installation. We can start appium server using command prompt from this folder.
- Navigate to C: -> Program Files -> Appium -> node_modules folder.
- Press and hold Ctrl + Shift Keys of keyboard and press mouse right click. It will open context menu as shown bellow.

- Select "Open command Window here" from context menu. It will open command prompt with navigation to given node_modules folder path.
- Type command node appium In command prompt and press enter.
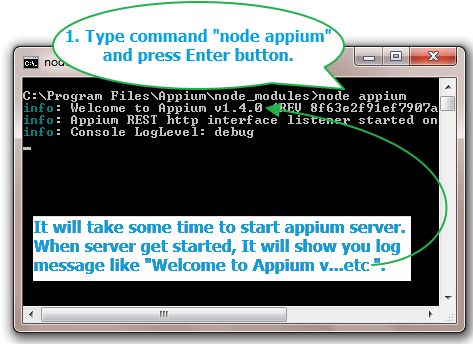
- It will take some time to start appium server. When server get started, It will show you log message like "Welcome to Appium v...etc " as shown in above Image.
- You can press CTRL+C to stop appium server on test completion.
That means appium server Is running and we can use It to perform Android software app testing on mobile devices. This way we can start appium server from command prompt too.
<< PREVIOUS || NEXT >>
Wednesday, December 16, 2015
Appium - Capture Screenshot On Failure Or Pass In Android Test Automation
Earlier In previous post, We learnt how to capture screenshot of android mobile software app screen on any stage In android appium software automation test. Now supposing I wants to capture screenshot on test failure or I wants to capture screenshot on software test pass. In this case, ITestListener Interface of TestNG can help us to capture screenshot on certain occurrence like test failure or software test pass.
ITestListener Interface
ITestListener Is an Interface of TestNG which can Invoke it's specific method on test failure or test pass or test skips, ect.. There are bellow given useful methods available In ITestListener Interface.
- onFinish(ITestContext context) - Invoked after all the software tests have run.
- onStart(ITestContext context) - Invoked after the test class is instantiated.
- onTestFailure(ITestResult result) - Invoked each time a test fails.
- onTestSkipped(ITestResult result) - Invoked each time a test is skipped.
- onTestStart(ITestResult result) - Invoked each time before a test will be invoked.
- onTestSuccess(ITestResult result) - Invoked each time a test succeeds.
You can view more detail on ITestListener Interface on THIS PAGE. Earlier we have used It In data driven framework. View THIS PAGE for more detail.
We will use android mobile's calculator app In this software automation test example.
We wants to capture screenshot on test pass or failure occurrence and store file in related folder. If test Is fail then capture screenshot and store It In Failures folder and If test Is pass then capture screenshot and store It In Pass folder under screenshots folder of your project as shown in bellow Image.

How To Do
We will create separate class file to write logic of capture screenshot on test fail or pass. Inside It, We will create separate method captureScreenShot to write logic to capture screenshot. We will use testng assertion to verify our software test is fail or pass and use ITestListener Interface to Invoke onTestFailure method on assertion failure and onTestSuccess on assertion pass and then call captureScreenShot method to take screenshot.
In test class file, We will write two test methods TestForFailure() and TestForPass(). Test method TestForFailure() Is written In such a way to fail It Intentionally.
Screenshot of TestForFailure() method will be stored Inside Failure folder and screenshot of TestForPass() method will be stored Inside Success folder.
Create And Run Test
I have created very simple example to demonstrate you how to capture screenshot on test failure or pass. You need to create two class files under Android package of your project as bellow.
ScreenshotUtility.java file contains logic to capture screenshot on test failure or pass.
ScreenshotUtility.java
package Android;

import java.io.File;
import java.io.IOException;
import java.text.DateFormat;
import java.text.SimpleDateFormat;
import java.util.Date;
import org.apache.commons.io.FileUtils;
import org.openqa.selenium.OutputType;
import org.openqa.selenium.TakesScreenshot;
import org.testng.ITestContext;
import org.testng.ITestListener;
import org.testng.ITestResult;

public class ScreenshotUtility implements ITestListener {
 // This method will execute before starting of Test suite.
 public void onStart(ITestContext tr) {

 }

 // This method will execute, Once the Test suite is finished.
 public void onFinish(ITestContext tr) {

 }

 // This method will execute only when the test is pass.
 public void onTestSuccess(ITestResult tr) {
  captureScreenShot(tr, "pass");
 }

 // This method will execute only on the event of fail test.
 public void onTestFailure(ITestResult tr) {
  captureScreenShot(tr, "fail");
 }

 // This method will execute before the main test start (@Test)
 public void onTestStart(ITestResult tr) {

 }

 // This method will execute only if any of the main test(@Test) get skipped
 public void onTestSkipped(ITestResult tr) {
 }

 public void onTestFailedButWithinSuccessPercentage(ITestResult tr) {
 }

 // Function to capture screenshot.
 public void captureScreenShot(ITestResult result, String status) {
  // AndroidDriver driver=ScreenshotOnPassFail.getDriver();
  String destDir = "";
  String passfailMethod = result.getMethod().getRealClass().getSimpleName() + "." + result.getMethod().getMethodName();
  // To capture screenshot.
  File scrFile = ((TakesScreenshot) ScreenshotOnPassFail.driver).getScreenshotAs(OutputType.FILE);
  DateFormat dateFormat = new SimpleDateFormat("dd-MMM-yyyy__hh_mm_ssaa");
  // If status = fail then set folder name "screenshots/Failures"
  if (status.equalsIgnoreCase("fail")) {
   destDir = "screenshots/Failures";
  }
  // If status = pass then set folder name "screenshots/Success"
  else if (status.equalsIgnoreCase("pass")) {
   destDir = "screenshots/Success";
  }

  // To create folder to store screenshots
  new File(destDir).mkdirs();
  // Set file name with combination of test class name + date time.
  String destFile = passfailMethod + " - " + dateFormat.format(new Date()) + ".png";

  try {
   // Store file at destination folder location
   FileUtils.copyFile(scrFile, new File(destDir + "/" + destFile));
  } catch (IOException e) {
   e.printStackTrace();
  }
 }
}
ScreenshotOnPassFail.java file contain android cal app test. If you see In bellow given test, We have used @Listeners annotation. It mansion that testng listeners are Implemented In ScreenshotUtility class file to listen.
ScreenshotOnPassFail.java
package Android;

import java.io.IOException;
import java.net.MalformedURLException;
import java.net.URL;
import java.util.concurrent.TimeUnit;
import io.appium.java_client.android.AndroidDriver;
import org.openqa.selenium.By;
import org.openqa.selenium.WebElement;
import org.openqa.selenium.remote.DesiredCapabilities;
import org.testng.annotations.AfterClass;
import org.testng.annotations.BeforeClass;
import org.testng.annotations.Listeners;
import org.testng.annotations.Test;

@Listeners({ ScreenshotUtility.class })
public class ScreenshotOnPassFail {
 static AndroidDriver driver;

 @BeforeClass
 public void initialize() throws MalformedURLException {
  DesiredCapabilities capabilities = new DesiredCapabilities();
  capabilities.setCapability("deviceName", "ZX1B32FFXF");
  capabilities.setCapability("browserName", "Android");
  capabilities.setCapability("platformVersion", "4.4.2");
  capabilities.setCapability("platformName", "Android");
  capabilities.setCapability("appPackage", "com.android.calculator2");
  capabilities.setCapability("appActivity", "com.android.calculator2.Calculator");
  driver = new AndroidDriver(new URL("http://127.0.0.1:4723/wd/hub"), capabilities);
  driver.manage().timeouts().implicitlyWait(5, TimeUnit.SECONDS);
 }

 // Method Is written In such a way to fail It Intentionally.
 // This method will fail as actual result 6 will not match with expected 7.
 @Test
 public void TestForFailure() throws IOException {
  // Click on DELETE/CLR button to clear result text box before running test.
  ((WebElement) driver.findElements(By.xpath("//android.widget.Button")).get(0)).click();
  // Click on 2, +, 4 and = buttons.
  driver.findElement(By.name("2")).click();
  driver.findElement(By.name("+")).click();
  driver.findElement(By.name("4")).click();
  driver.findElement(By.name("=")).click();
  // Get result from calc result textbox.
  String result = driver.findElement(By.className("android.widget.EditText")).getText();
  // Compare actual and expected result using testng assertion and mark test pass or fail based on result.
  // Assertion will fail. So It will call onTestFailure method from ScreenshotUtility.
  assert result.equals("7") : "Expected value : 7 did not match with Actual value: "+ result;
 }

 @Test
 public void TestForPass() throws IOException {
  // Click on DELETE/CLR button to clear result text box before running test.
  ((WebElement) driver.findElements(By.xpath("//android.widget.Button")).get(0)).click();
  // Click on 3, +, 4 and = buttons.
  driver.findElement(By.name("3")).click();
  driver.findElement(By.name("+")).click();
  driver.findElement(By.name("4")).click();
  driver.findElement(By.name("=")).click();
  // Get result from calc result textbox.
  String result = driver.findElement(By.className("android.widget.EditText")).getText();
  // Compare actual and expected result using testng assertion and mark test pass or fail based on result.
  // Assertion will pass. So It will call onTestSuccess method from ScreenshotUtility.
  assert result.equals("7") : "Expected value : 7 did not match with Actual value: " + result;
 }

 @AfterClass
 public void End() {
  driver.quit();
 }
}
Connect your device with PC and run above ScreenshotOnPassFail test using testng and appium.
- TestForFailure() method : Here assertion will fail so onTestFailure method will be called from ScreenshotUtility.java. It will capture screenshot and store It in Failures folder under screenshots folder.
- TestForPass() method : Here assertion will pass so onTestSuccess method will be called from ScreenshotUtility.java. It will capture screenshot and store It in Success folder under screenshots folder.
This Is the way to capture screenshot on failure or pass of any android appium software automation test.
Tuesday, December 15, 2015
Top 3 Free Struts Books for Java EE developers - Learn Online, PDF download
Jakarta Struts is one of the most popular MVC frameworks to create a Java web application. Struts 1.0 had ruled the world in early 2000 era before Spring MVC took over. Still there are lots of projects written in Struts which needs active maintenance and that's why Struts developers are still in demand. It has not become anything like COBOL, but the latest version of Struts 2.0 is a capable web MVC framework with dependency injection and has a sizable community behind it. It has close competition with Spring MVC but given the demand for Struts developer, it's still a good technology to learn if you are looking for the job in Java web development position. What is the best way to learn Struts? Well, you can start with books and who doesn't like free eBooks and I am going to share some of the good free Ebooks to learn Struts, useful for both Java and J2EE developers.
Read more »
Sunday, December 13, 2015
Appium - Capture Screenshot Android App Mobile Screen
Capturing screenshot in appium android automation Is main requirement for any software automation tool. During software automation testing process, It should allow you to capture screenshot automatically to show bug or some design Issue to development/design team. For android software application automation testing using appium, We can use TakesScreenshot Interface of WebDriver to capture screenshot of android app screen. I have prepared simple example on how to capture screenshot In android appium automation software test using TakesScreenshot Interface of WebDriver.
App To Use Capture Screenshot Test
We will use API Demos android software app for Capture Screenshot test. You can download it from HERE.
Aim to Achieve In Capture Screenshot Test
We wants to capture screenshot of android mobile screen on some stage of appium automation test. And then we will store It Inside screenshots folder under project. We will prepare file name using current date time programmatically as shown In bellow Image.

Above Image shows screenshot which Is taken during android appium automation test.
Create And Run Capture Screenshot Test
Create new file CaptureScreenShot.java file under your Android package of your project and write bellow given test script In It.
package Android;

import io.appium.java_client.android.AndroidDriver;

import java.io.File;
import java.io.IOException;
import java.net.URL;
import java.text.DateFormat;
import java.text.SimpleDateFormat;
import java.util.Date;
import java.util.concurrent.TimeUnit;
import org.apache.commons.io.FileUtils;
import org.openqa.selenium.By;
import org.openqa.selenium.Dimension;
import org.openqa.selenium.OutputType;
import org.openqa.selenium.TakesScreenshot;
import org.openqa.selenium.remote.DesiredCapabilities;
import org.testng.annotations.AfterTest;
import org.testng.annotations.BeforeTest;
import org.testng.annotations.Test;

public class CaptureScreenShot {
 AndroidDriver driver;
 Dimension size;
 String destDir;
 DateFormat dateFormat;

 @BeforeTest
 public void setUp() throws Exception {
  DesiredCapabilities capabilities = new DesiredCapabilities();
  capabilities.setCapability("deviceName", "ZX1B32FFXF");
  capabilities.setCapability("browserName", "Android");
  capabilities.setCapability("platformVersion", "4.4.2");
  capabilities.setCapability("platformName", "Android");
  capabilities.setCapability("appPackage", "io.appium.android.apis");
  capabilities.setCapability("appActivity", "io.appium.android.apis.ApiDemos");
  driver = new AndroidDriver(new URL("http://127.0.0.1:4723/wd/hub"), capabilities);
  driver.manage().timeouts().implicitlyWait(15, TimeUnit.SECONDS);
 }

 @Test
 public void ScrollToTab() {
  // Scroll till element which contains "Views" text If It Is not visible on screen.
  driver.scrollTo("Views");
  // Click on Views.
  driver.findElement(By.name("Views")).click();
  // Scroll till element which contains "Tabs" text If It Is not visible on screen.
  driver.scrollTo("Tabs");
  //Call takeScreenShot() function to capture screenshot of android screen.
  takeScreenShot();

 }

 public void takeScreenShot() {
  // Set folder name to store screenshots.
  destDir = "screenshots";
  // Capture screenshot.
  File scrFile = ((TakesScreenshot) driver).getScreenshotAs(OutputType.FILE);
  // Set date format to set It as screenshot file name.
  dateFormat = new SimpleDateFormat("dd-MMM-yyyy__hh_mm_ssaa");
  // Create folder under project with name "screenshots" provided to destDir.
  new File(destDir).mkdirs();
  // Set file name using current date time.
  String destFile = dateFormat.format(new Date()) + ".png";

  try {
   // Copy paste file at destination folder location
   FileUtils.copyFile(scrFile, new File(destDir + "/" + destFile));
  } catch (IOException e) {
   e.printStackTrace();
  }
 }

 @AfterTest
 public void End() {
  driver.quit();
 }
}
Test Description
Above android appium software test will navigate to Views screen and scroll down till Tabs text on API Demos android app. Then It will call takeScreenShot(); method to capture and store android app screenshot. takeScreenShot() method will,
- Capture screenshot using TakesScreenshot Interface of webdriver.
- Get current date and time and store It in variable.
- Create new folder with name "screenshots" under your project.
- Set file name using current date and time.
- Store file In "screenshots" folder.
When you run above test, It will create screenshots folder under your project and store screenshot file In It. Refresh your project folder after test execution to see new created folder and screenshot file.
This way you can capture and store screenshot of any android app.
Wednesday, December 9, 2015
Top 30 OOPS Concept Interview Questions Answers in Java
Java is an object-oriented programming language and you will see a lot of object oriented programming concept questions on Java interviews. The classic questions like difference between interface and abstract class are always there but from the last couple of years more sophisticated questions based upon advanced design principles and patterns are also asked to check OOP knowledge of the candidate. Though, Object oriented programming questions are more popular on Java interviews for 1 to 3 years experienced programmers. It makes sense as well, as these are the programmers who must know the OOP basic like Abstraction, Inheritance, Composition, Class, Object, Interface, Encapsulation etc. If you look for Java interview questions for 2 to 4 years experienced programmer, you will find lots of questions based upon OOP fundamentals like Inheritance and Encapsulation but as you gain more experience, you will see questions based upon object oriented analysis and design e.g. code a vending design machine or implement a coffeemaker in Java. These questions are more difficult and require not only true understanding of OOP fundamental but also about SOLID design principles and patterns.
Tuesday, December 8, 2015
Appium - Set Date And Time In Android App Test Automation
Android software apps contains date pickers. Date picker can be Inline or It can be In dialog. Just like other elements of android app software, We can automate android app's date dialog to set date and time dialog to set time In android appium software automation test. Here I have demonstrated simple example on how to set android app date and time In appium test. For your android app's date picker, Date format can be different but method to set It will remain same as described bellow.
App To Use Android App Date And Time Test
We will use same API Demos app to demonstrate how to set date and time In android appium software automation test. Download API Demos android software app from THIS PAGE.
Aim To Achieve In Set Date Time Test
We wants to set date = 25 Aug 2009 In date dialog and time = 1:25 pm In time dialog as shown In bellow Images.
Set Date In Dialog

Set Time In Dialog

Manually you can navigate to above screen from API Demos app -> Tap on Views -> Tap on Date Widgets -> Tap on 1. Dialog.
Create and Run Set Date Time Android Appium Test
Create new SetDate.java file under Android package of your project to test android software app and copy paste bellow given test script In It.
SetDate.java
package Android;

import io.appium.java_client.android.AndroidDriver;

import java.net.URL;
import java.util.concurrent.TimeUnit;

import org.openqa.selenium.By;
import org.openqa.selenium.remote.DesiredCapabilities;
import org.testng.annotations.AfterTest;
import org.testng.annotations.BeforeTest;
import org.testng.annotations.Test;

public class SetDate {
 AndroidDriver driver;

 @BeforeTest
 public void setUp() throws Exception {
  DesiredCapabilities capabilities = new DesiredCapabilities();
  capabilities.setCapability("deviceName", "ZX1B32FFXF");
  capabilities.setCapability("browserName", "Android");
  capabilities.setCapability("platformVersion", "4.4.2");
  capabilities.setCapability("platformName", "Android");
  capabilities.setCapability("appPackage", "io.appium.android.apis");
  capabilities.setCapability("appActivity","io.appium.android.apis.ApiDemos");
  driver = new AndroidDriver(new URL("http://127.0.0.1:4723/wd/hub"), capabilities);
  driver.manage().timeouts().implicitlyWait(15, TimeUnit.SECONDS);
 }

 @Test
 public void dateSet() {
  // Scroll till element which contains "Views" text.
  driver.scrollTo("Views");
  // Click on Views.
  driver.findElement(By.name("Views")).click();
  // Scroll till element which contains "Date Widgets" text.
  driver.scrollTo("Date Widgets");
  // Click on element which contains "Date Widgets" text.
  driver.findElement(By.name("Date Widgets")).click();
  // Scroll till element which contains "1. Dialog" text.
  driver.scrollTo("1. Dialog");
  // Click on element which contains "1. Dialog" text.
  driver.findElement(By.name("1. Dialog")).click();
  // Click on button which contains "change the date" text.
  driver.findElement(By.name("change the date")).click();
  //Set Date = 25.
  driver.findElement(By.xpath("//android.widget.NumberPicker[@index='0']")).sendKeys("25");
  //Set Month = Aug.
  driver.findElement(By.xpath("//android.widget.NumberPicker[@index='1']")).sendKeys("Aug");
  //Set Year = 2009.
  driver.findElement(By.xpath("//android.widget.NumberPicker[@index='2']")).sendKeys("2009");
  //Click on Done button.
  driver.findElement(By.id("android:id/button1")).click();
 }


 @Test
 public void timeSet() {
  // Click on button which contains "change the time" text.
  driver.findElement(By.name("change the time")).click();
  //Set Hours = 1.
  driver.findElement(By.xpath("//android.widget.NumberPicker[@index='0']")).sendKeys("1");
  //Set Minutes = 25.
  driver.findElement(By.xpath("//android.widget.NumberPicker[@index='2']")).sendKeys("25");
  //Set pm.
  driver.findElement(By.xpath("//android.widget.NumberPicker[@index='1']")).sendKeys("pm");
  //Click on Done button.
  driver.findElement(By.id("android:id/button1")).click();
 }
 @AfterTest
 public void End() {
  driver.quit();
 }
}
Test Script Description
As you can see In above test, We have created two @Test methods.
dateSet() Method
dateSet() method will,
- Navigate to Dialog Screen.
- Then It will click on change the date button. It will open set date dialog.
- Next 3 driver.findElement() method will locate date, month and year textbox and set requested date, month and year In related field.
- Then It will click on Done button to close date dialog.
timeSet() method
- It will click on change the time button. It will open set time dialog.
- Next 3 driver.findElement() method will locate hour, minute and am or pm textbox and set requested hour, minute and am or pm In related field.
- Then It will click on Done button to close date dialog.
This Is the way to set date and time in date and time dialog of android appium software automation test.
Subscribe to:
Posts (Atom)