Search

Saturday, November 28, 2015

Pefrorm MultiTouch Action Using Appium In Android Application Automation

MultiTouch Action In android mobile software app Is one of the common action. Earlier we learn usage of TouchAction class In appium android software automation test to perform DRAG AND DROP and SWIPE ELEMENT. You also needs to automate multi touch action In your android mobile software app. Here I have demonstrated simple example on how to perform multi touch action In your android mobile softwareapp.

Install MultiTouch Tester App In Android Mobile
We will use MultiTouch Tester software App In this android appium multi touch action automation test example. So you need to download and Install MultiTouch Tester android software App In your mobile device. You can download and Install MultiTouch Tester App from Google Play Store or THIS PAGE.

Aim To Achieve In This Test
We wants to perform multi touch at 5 different points at the same time on MultiTouch Tester App's screen as shown In bellow Image.


This Is what we wants to achieve from this appium android test example.

Get X And Y Coordinates Of All Touch Points
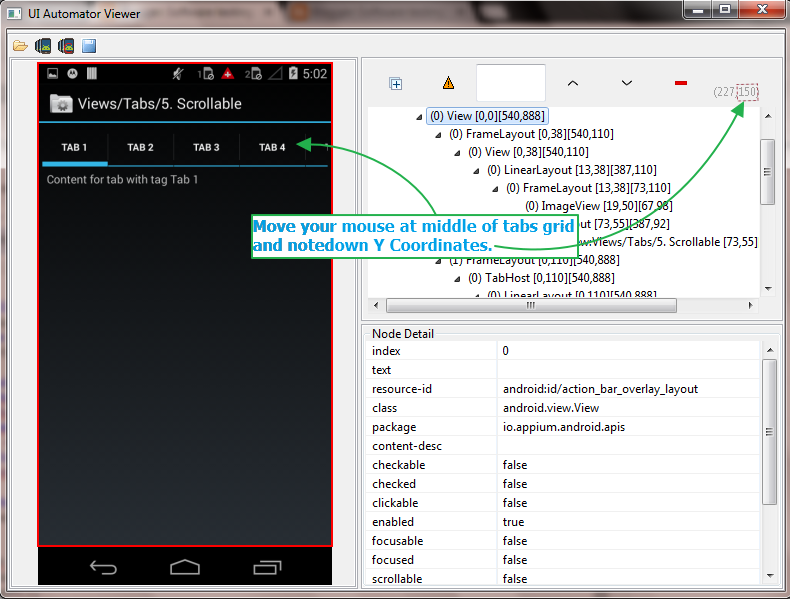
In above Image you can see that there are 5 points where we wants to perform MultiTouch Action In appium android automation test. You can get X Y Coordinates of all 5 touch points manually using uiautomatorviewer too as described In THIS POST

In our appium test, We will calculate X and Y Coordinates of all 5 touching points pragmatically by calculating screen's width  and then will get different x and y points using size.width and size.height methods.

Create And Run Android Appium MultiTouch Action Test
Create new MultiTouch.java file under your project and copy paste bellow given test script Inside It.

package Android;

import io.appium.java_client.MobileDriver;
import io.appium.java_client.MultiTouchAction;
import io.appium.java_client.TouchAction;
import io.appium.java_client.android.AndroidDriver;
import java.net.URL;
import java.util.concurrent.TimeUnit;
import org.openqa.selenium.Dimension;
import org.openqa.selenium.remote.DesiredCapabilities;
import org.testng.annotations.AfterTest;
import org.testng.annotations.BeforeTest;
import org.testng.annotations.Test;

public class MultiTouch {
AndroidDriver driver;
Dimension size;

@BeforeTest
public void setUp() throws Exception {
DesiredCapabilities capabilities = new DesiredCapabilities();
capabilities.setCapability("deviceName", "ZX1B32FFXF");
capabilities.setCapability("browserName", "Android");
capabilities.setCapability("platformVersion", "4.4.2");
capabilities.setCapability("platformName", "Android");
capabilities.setCapability("appPackage","com.the511plus.MultiTouchTester");
capabilities.setCapability("appActivity","com.the511plus.MultiTouchTester.MultiTouchTester");
driver = new AndroidDriver(new URL("http://127.0.0.1:4723/wd/hub"),capabilities);
driver.manage().timeouts().implicitlyWait(15, TimeUnit.SECONDS);
}

@Test
public void mTouchAction() throws InterruptedException {

size = driver.manage().window().getSize();
//Get X Y Coordinates for touch action 1(Top left side).
int x1 = (int) (size.width * 0.20);
int y1 = (int) (size.height * 0.20);

//Get X Y Coordinates for touch action 2(Top right side).
int x2 = (int) (size.width * 0.80);
int y2 = (int) (size.height * 0.20);

//Get X Y Coordinates for touch action 3(Bottom left side).
int x3 = (int) (size.width * 0.20);
int y3 = (int) (size.height * 0.80);

//Get X Y Coordinates for touch action 4(Bottom right side).
int x4 = (int) (size.width * 0.80);
int y4 = (int) (size.height * 0.80);

//Get X Y Coordinates for touch action 5(middle of the screen).
int x5 = size.width / 2;
int y5 = size.height / 2;

// Create object of MultiTouchAction class.
MultiTouchAction maction = new MultiTouchAction((MobileDriver) driver);

// Set touch action1 on given X Y Coordinates of screen.
TouchAction action1 = new TouchAction((MobileDriver) driver).longPress(x1, y1).waitAction(1500);
// Set touch action2 on given X Y Coordinates of screen.
TouchAction action2 = new TouchAction((MobileDriver) driver).longPress(x2, y2).waitAction(1500);
// Set touch action3 on given X Y Coordinates of screen.
TouchAction action3 = new TouchAction((MobileDriver) driver).longPress(x3, y3).waitAction(1500);
// Set touch action4 on given X Y Coordinates of screen.
TouchAction action4 = new TouchAction((MobileDriver) driver).longPress(x4, y4).waitAction(1500);
// Set touch action5 on given X Y Coordinates of screen.
TouchAction action5 = new TouchAction((MobileDriver) driver).longPress(x5, y5).waitAction(1500);

// Generate multi touch action chain using different actions and perform It.
maction.add(action1).add(action2).add(action3).add(action4).add(action5).perform();
}

@AfterTest
public void End() {
driver.quit();
}
}

MultiTouch Action Script Description
In above test you can see,
  • First of all we have collected X and Y coordinates(x1,y1, x2,y2, ..ect) for different touch point positions.
  • MultiTouchAction Is a class which provides us a facility to generate multi touch action chain using touch action chain.
  • We have created touch action chain for all 5 touch points using TouchAction class.
  • And then added all 5 touch actions In MultiTouchAction chain using .add(TouchAction action) method.
  • perform() action will perform steps given In MultiTouchAction chain.
Now you can run above test script In your android mobile device using appium and testng. It will launch MultiTouch Tester App In your android mobile device and then perform multitouch action.

Test Apps To Use In Appium Automation Tests

We will use bellow given android software apps in different appium software automation test examples. You can download android software apps directly from here to use in appium software automation test examples.
  1. MultiTouch Tester App (com.the511plus.MultiTouchTester.apk)
  2. APKinfo App (com.intelloware.apkinfo.apk)
  3. Android Calculator App(com.android.calculator2.apk)
  4. Drag-Sort Demos App(com.mobeta.android.demodslv-0.5.0-3_APKdot.com.apk)
  5. SwipeListView Demo App(SwipeListView Demo_v1.13_apkpure.com.apk)
  6. ApiDemos App(ApiDemos.apk)

8 Difference between HashMap and TreeMap with Example

HashMap and TreeMap both store key value pair in their object. Difference between HashMap and TreeMap is one of the question you must at least go through once before appearing for the java interview. I have already shared how HashMap works in java and how TreeMap works in java. In this article we will see not only the difference between HashMap and TreeMap but also the similarities between them with examples.

Read Also :  Difference between Iterator and ListIterator with Example


Difference between HashMap and TreeMap in Java 

1. Ordering : HashMap does not maintain any order. In other words , HashMap does not provide any guarantee that the element inserted first will be printed first.


import java.util.HashMap;

public class HashMapExample {

public static void main(String[] args) {

HashMap obj1 = new HashMap();
obj1.put("Alive is","Awesome");
obj1.put("Love","Yourself");
System.out.println(obj1);
}
} 
 
OUTPUT : [Alive is = Awesome, Love = Yourself]   


Just like TreeSet , TreeMap  elements are also sorted according to the natural ordering of its elements . If TreeMap objects can not be sorted in natural order than use compareTo() method to sort the elements of TreeMap object.


import java.util.TreeMap;

public class TreeMapExample {

public static void main(String[] args) {

TreeMap<String,String> obj1= new TreeMap<String,String>();
obj1.put("Alive is" , "Awesome");
obj1.put("Love" , "Yourself");
System.out.println(obj1);

}

}
 
OUTPUT : [Alive is = Awesome, Love = Yourself]   


2. Implementation : Internal HashMap implementation use Hashing.
TreeMap internally uses Red-Black tree implementation.

3. Null keys and null value : HashMap can store one null key and many  null values.
TreeMap can not contain null keys but may contain many null values.

4. Performance : HashMap  take constant time performance for the basic operations like get and put i.e O(1).
According to Oracle docs , TreeMap provides guaranteed log(n) time cost for the get and put method.

hashmap vs treemap in java with example
5. Speed :   HashMap is much faster than TreeMap, as performance time of HashMap is constant against the log time TreeMap for most operations.

6. Functionality :   Just like TreeSet , TreeMap is rich in functionality. Functions like pollFirstEntry() , pollLastEntry() , tailMap() , firstKey() , lastKey() etc. are not present in HashMap.

7.  Comparison : HashMap uses equals() method in comparison while TreeMap uses compareTo() method for maintaining ordering.

8. Interfaces implemented : HashMap implements Map interface while TreeMap implements NavigableMap interface.


Similarities between HashMap and TreeMap in Java

1. Fail-fast iterators : The iterator's returned by the both class are fail-fast . Hence , if the object is modified after the iterator is created , in any way except through the iterator's own remove() method , the iterator will throw the ConcurrentModificationException.

2. Clone() method  : Both HashMap and TreeMap uses shallow copy technique to create clone of their objects.

3. Not Thread Safe :  Both HashMap and TreeMap class are unsynchronized . In other words , multiple threads can access the same object at a given time.
Although you can externally make both the classes synchronized :

HashMap :      Map m = Collections.synchronizedMap(new HashMap (...));
TreeMap :       Map m = Collections.synchronizedSortedMap(new TreeMap (...));

4. Package :  Both classes belong to the same package java.util and both are the members of the Java Collections Framework.


When to Prefer TreeMap over HashMap 

1. Sorted elements are required instead of unordered  elements. The sorted list return by TreeMap is always in ascending order.

2. TreeMap uses Red-Black algorithm underneath  to sort out the elements . When one need to perform read/write operations frequently , then TreeMap is a good choice.


Recap: Difference between HashMap and TreeMap in Java


HashMapTreeMap
OrderingNoYes
ImplementationHashingRed-Black Tree 
Null Keys and Null valuesOne null key ,Any null valuesNot permit null keys ,but any null values
PerformanceO(1)log(n)
SpeedFastSlow in comparison
FunctionalityProvide Basic functionsProvide Rich functionality
Comparisonuses equals() methoduses compareTo() method
Interface implementedMapNavigable Map


In case you have any other query please mention in the comments .

Tuesday, November 24, 2015

Appium - How To Scroll Horizontal Tabs Using Appium In Android App

In android appium software automation test, You also needs to scroll tabs horizontally(from right to left or left to right) If there are multiple tabs In your android software app and you wants to navigate to the tab which Is displaying when you scroll tabs horizontally. Earlier In my previous post, We learnt how to scroll down In android software app using appium test. We also learnt how to swipe In android software app using driver.swipe() In THIS POST and using TouchAction class In THIS POST. Here we can use driver.swipe() method to swipe tabs from right to left. I have prepared very simple android software automation example to learn how to swipe android app's tabs In appium automation test.

Install API Demos App In Mobile Device
You can view my PREVIOUS POST to know from where to download API Demos App. Install It In your mobile device.

Aim To Achieve In This Appium Test
In this test, We wants to scroll tabs horizontally from right to left side until Tab 11 display as shown in bellow Image.


Manually you can view above given screen In your mobile device from API Demos App -> Views -> Tabs -> 5. Scrollable. You will find that top level tabs are scroll-able.

Before learning tabs scrolling In appium software automation test, I recommend you to read my previous post about vertical scrolling In appium test as we are going to use vertical scrolling in this example too.

Get Y Coordinates Of Tabs Grid Middle
To get Y Coordinates of tabs grid,
  1. Connect your mobile device with PC and open API Demos app In your device.
  2. Navigate manually to 5. Scrollable section as described above.
  3. Open uiautomatorviewer from tools folder of SDK. view THIS POST.
  4. Capture Screenshot by clicking on Capture screenshot button.
  5. Move your mouse at middle of tabs grid.
  6. Note down Y Coordinates as shown In bellow Image.

Create And Run Android Appium Tabs Scrolling Test
Create new ScrollTabs.java file under your project and copy paste bellow given test script In It.

Note : Please set your device's capabilities in bellow given test.
ScrollTabs.java
package Android;

import io.appium.java_client.android.AndroidDriver;

import java.net.URL;
import java.util.concurrent.TimeUnit;
import org.openqa.selenium.By;
import org.openqa.selenium.Dimension;
import org.openqa.selenium.WebElement;
import org.openqa.selenium.remote.DesiredCapabilities;
import org.testng.annotations.AfterTest;
import org.testng.annotations.BeforeTest;
import org.testng.annotations.Test;

public class ScrollTabs {
AndroidDriver driver;
Dimension size;
@BeforeTest
public void setUp() throws Exception {
DesiredCapabilities capabilities = new DesiredCapabilities();
capabilities.setCapability("deviceName", "ZX1B32FFXF");
capabilities.setCapability("browserName", "Android");
capabilities.setCapability("platformVersion", "4.4.2");
capabilities.setCapability("platformName", "Android");
capabilities.setCapability("appPackage", "io.appium.android.apis");
capabilities.setCapability("appActivity","io.appium.android.apis.ApiDemos");
driver = new AndroidDriver(new URL("http://127.0.0.1:4723/wd/hub"),capabilities);
driver.manage().timeouts().implicitlyWait(15, TimeUnit.SECONDS);
}

@Test
public void ScrollToTab() throws InterruptedException {
//Scroll till element which contains "Views" text If It Is not visible on screen.
driver.scrollTo("Views");
//Click on Views/.
driver.findElement(By.name("Views")).click();
System.out.println("Vertical scrolling has been started to find text -> Tabs.");
//Scroll till element which contains "Tabs" text.
driver.scrollTo("Tabs");
System.out.println("Tabs text has been found and now clicking on It.");
//Click on Tabs
driver.findElement(By.name("Tabs")).click();
//Click on Scrollable text element.
driver.findElement(By.name("5. Scrollable")).click();
System.out.println("Horizontal scrolling has been started to find tab -> Tab 11.");
//Used for loop to scroll tabs until Tab 11 displayed.
for(int i=0; i<=10; i++){
//Set implicit wait to 2 seconds for fast horizontal scrolling.
driver.manage().timeouts().implicitlyWait(2, TimeUnit.SECONDS);
if(driver.findElements(By.name("Tab 11")).size()!= 0){
//If Tab 11 Is displayed then click on It.
System.out.println("Tab 11 has been found and now clicking on It.");
driver.findElement(By.name("Tab 11")).click();
break;
}else{
//If Tab 11 Is not displayed then scroll tabs from right to left direction by calling ScrollTabs() method.
ScrollTabs();
}
}
//Set implicit wait to 15 seconds after horizontal scrolling.
driver.manage().timeouts().implicitlyWait(15, TimeUnit.SECONDS);

//Locate parent element of text area.
WebElement ele1 = (WebElement) driver.findElements(By.id("android:id/tabcontent")).get(0);
//Locate text area of Tab 11 using It's parent element.
WebElement ele2 = ele1.findElement(By.className("android.widget.TextView"));
//Get text from text area of Tab 11 and print It In console.
System.out.println("Text under selected tab is -> "+ele2.getText());
}

//To scroll tabs right to left In horizontal direction.
public void ScrollTabs() {
//Get the size of screen.
size = driver.manage().window().getSize();

//Find swipe start and end point from screen's with and height.
//Find startx point which is at right side of screen.

int startx = (int) (size.width * 0.70);
//Find endx point which is at left side of screen.
int endx = (int) (size.width * 0.30);
//Set Y Coordinates of screen where tabs display.
int YCoordinates = 150;

//Swipe tabs from Right to Left.
driver.swipe(startx, YCoordinates, endx, YCoordinates, 3000);
}

@AfterTest
public void End() {
driver.quit();
}
}

Test Script Description
In above test script, 
  • I have used for loop to continue execution until Tab 11 display on screen.
  • If condition Inside for loop will check If Tab 11 Is displayed or not.
  • If tab 11 Is displayed then click on It and break the loop.
  • Else Call ScrollTabs(); method which Is responsible for swiping tab from right to left.
  • Statements written bellow for loop will get text from  text area and print It In console.
Now I hope, You already learnt how to run appium software automation test In eclipse with testng. View my previous appium tutorials for more detail. When you run above test, It will Navigate to 5. Scrollable screen and then scroll tabs In horizontal direction until Tab 11 displayed.

This way you can scroll tabs in horizontal direction In your appium android test.

Saturday, November 21, 2015

Appium Android Example On How To Scroll Down To Text

Earlier In THIS POST, we learnt how to swipe In horizontal or vertical direction In any android software app using driver.swipe() and swiping element in horizontal direction using action chain In previous post. Most of android applications contain list view and you need to scroll down to select specific element. You can use scrollTo(String text) method of IOSElement class If you wants to scroll down till specific text in appium software automation test. Let's try to Implement It practically In android software appium automation test to know how scrollTo(String text) method works.

PREREQUISITES : All previous 21 steps of appium mobile software app automation tutorials (PART 1 and PART 2) should be completed.

Download And Install API Demos App
We will use API Demos In this example. You can download API Demos android software app from GOOGLE PLAY STORE or THIS PAGE. Install It In your mobile device.

Aim To Achieve In This Appium Test
We wants to scroll down till selected element which contains text "Tabs" as shown In bellow Image. And then we wants to tap on It("Tabs" text). Manually you can view bellow given scroll-able listing in API Demos software App from API Demos App -> Views.


So In appium test,
  1. First we will open API Demos App, 
  2. Tap on "Views".
  3. On next screen, Scroll down till element which contain text "Tabs".
  4. And tap on element which contain text "Tabs". 
Create And Run Android Appium scrollTo Text Test
Create ScrollingToText.java file under Android package of your project and copy paste bellow given test script In It.

Note : Please set your device's capabilities in bellow given test.
ScrollingToText.java
package Android;

import io.appium.java_client.android.AndroidDriver;
import java.net.URL;
import java.util.concurrent.TimeUnit;
import org.openqa.selenium.By;
import org.openqa.selenium.remote.DesiredCapabilities;
import org.testng.annotations.AfterTest;
import org.testng.annotations.BeforeTest;
import org.testng.annotations.Test;

public class ScrollingToText {
AndroidDriver driver;

@BeforeTest
public void setUp() throws Exception {
DesiredCapabilities capabilities = new DesiredCapabilities();
capabilities.setCapability("deviceName", "ZX1B32FFXF");
capabilities.setCapability("browserName", "Android");
capabilities.setCapability("platformVersion", "4.4.2");
capabilities.setCapability("platformName", "Android");
capabilities.setCapability("appPackage", "io.appium.android.apis");
capabilities.setCapability("appActivity","io.appium.android.apis.ApiDemos");
driver = new AndroidDriver(new URL("http://127.0.0.1:4723/wd/hub"), capabilities);
driver.manage().timeouts().implicitlyWait(15, TimeUnit.SECONDS);
}

@Test
public void ScrollToText() throws InterruptedException {
//Scroll till element which contains "Views" text If It Is not visible on screen.
driver.scrollTo("Views");
// Click on Views/.
driver.findElement(By.name("Views")).click();
System.out.println("Scrolling has been started to find text -> Tabs.");
// Scroll till element which contains Tabs text.
driver.scrollTo("Tabs");
System.out.println("Tabs text has been found and now clicking on It.");
// Click on Tabs.
driver.findElement(By.name("Tabs")).click();
}

@AfterTest
public void End() {
driver.quit();
}
}

Test Script Description
If you look at above test example, We have used driver.scrollTo(String text) methods for scrolling. It will scroll down steps by step and look If given text Is displayed on screen or not. When text appears, It will stop scrolling.
  • First driver.scrollTo("Views"); will check if element containing test "Views" Is display on screen or not. If not display then It will scroll down down and check for text once again.
  • Same way, Second driver.scrollTo("Tabs"); will scroll down and check for text "Tabs".
To see scrollToText demo practically, Run above test using testng and appium and observe result on your android mobile screen.

This way you can scroll down vertically to find specific element and click on It.

Saturday, November 14, 2015

Swipe Element Using TouchAction Class In Android Appium Example

Earlier In previous post, we learnt how to interact with android mobile gesture to perform horizontal and vertical swipe using driver.swipe() in appium mobile software automation test. In THIS POST, We also learnt - how to perform drag and drop in android app by generating action chain using TouchAction class. Here we can use same TouchAction class to swipe particular element horizontally in android software app. Let's see how can we use TouchAction class to swipe element.

PREREQUISITES : All previous 20 steps of mobile software app's appium tutorials (PART 1 and PART 2) should be completed.

Install SwipeListView Demo App
You can view my previous post to learn how to download and install SwipeListView Demo software app in your android mobile device.

Aim To Achieve In This Appium Test
Our aim Is to swipe particular element in horizontal(Right to left and then left to right) direction. As you can see In bellow image, We wants to swipe 4th element from listing grid of SwipeListView Demo app in horizontal(Right to left and then left to right) direction.


Get element's Y axis coordinates
In order to swipe element in X(horizontal) direction, You need to find element's position in Y direction. To Get It,
  • Connect your mobile phone with PC with USB debugging mode enabled. VIEW MORE.
  • Open SwipeListView Demo app In mobile device.
  • Open UI Automator Viewer from tools folder of SDK. View THIS POST for more detail on UI Automator Viewer.
  • Capture device's screenshot In UI Automator Viewer.
  • Put mouse cursor at middle of 4th element.
  • Note down Y Coordinates as shown in bellow Image.


We will use this Y coordinates In our appium test script to perform swipe.

Create And Run Android Appium Test To Swipe Element
I have created very simple test script to swipe android app's element In horizontal direction. Create new class file SwipeAction.java under Android package of your project In eclipse and copy paste bellow given test script In It.

Note : Please set your device's capabilities in bellow given test.
SwipeAction.java
package Android;

import io.appium.java_client.MobileDriver;
import io.appium.java_client.TouchAction;
import io.appium.java_client.android.AndroidDriver;
import java.net.URL;
import java.util.concurrent.TimeUnit;
import org.openqa.selenium.By;
import org.openqa.selenium.Dimension;
import org.openqa.selenium.WebElement;
import org.openqa.selenium.remote.DesiredCapabilities;
import org.openqa.selenium.support.ui.ExpectedConditions;
import org.openqa.selenium.support.ui.WebDriverWait;
import org.testng.annotations.AfterTest;
import org.testng.annotations.BeforeTest;
import org.testng.annotations.Test;

public class SwipeAction {
AndroidDriver driver;
Dimension size;
WebDriverWait wait;
@BeforeTest
public void setUp() throws Exception {
DesiredCapabilities capabilities = new DesiredCapabilities();
capabilities.setCapability("deviceName", "ZX1B32FFXF");
capabilities.setCapability("browserName", "Android");
capabilities.setCapability("platformVersion", "4.4.2");
capabilities.setCapability("platformName", "Android");
capabilities.setCapability("appPackage", "com.fortysevendeg.android.swipelistview");
capabilities.setCapability("appActivity","com.fortysevendeg.android.swipelistview.sample.activities.SwipeListViewExampleActivity");
driver = new AndroidDriver(new URL("http://127.0.0.1:4723/wd/hub"),capabilities);
driver.manage().timeouts().implicitlyWait(15, TimeUnit.SECONDS);
wait = new WebDriverWait(driver, 300);
wait.until(ExpectedConditions.elementToBeClickable(By.className("android.widget.RelativeLayout")));
}


@Test
public void swipingHorizontal() throws InterruptedException {
//Get the size of screen.
size = driver.manage().window().getSize();
System.out.println(size);

//Find swipe x points from screen's with and height.
//Find x1 point which is at right side of screen.

int x1 = (int) (size.width * 0.20);
//Find x2 point which is at left side of screen.
int x2 = (int) (size.width * 0.80);

//Create object of TouchAction class.
TouchAction action = new TouchAction((MobileDriver)driver);

//Find element to swipe from right to left.
WebElement ele1 = (WebElement) driver.findElementsById("com.fortysevendeg.android.swipelistview:id/front").get(3);
//Create swipe action chain and perform horizontal(right to left) swipe.
//Here swipe to point x1 Is at left side of screen. So It will swipe element from right to left.

action.longPress(ele1).moveTo(x1,580).release().perform();

//Find element to swipe from left to right.
WebElement ele2 = (WebElement) driver.findElementsById("com.fortysevendeg.android.swipelistview:id/back").get(3);
//Create swipe action chain and perform horizontal(left to right) swipe.
//Here swipe to point x2 Is at right side of screen. So It will swipe element from left to right.

action.longPress(ele2).moveTo(x2,580).release().perform();
}

@AfterTest
public void End() {
driver.quit();
}
}

Test Explanation
  • ele1 Is an element located to swipe from right side to left side.
  • ele2 Is an element located to swipe from left side to right side.
  • longPress() method will press and hold given element.
  • moveTo(X, Y) method will move element to given X and Y coordinates.
  • release() method will remove the current touching implement from the screen.
  • perform() will perform this chain of actions on the driver.
Now start appium server and run test script In eclipse and observe element swipe operation in your android mobile device. This way you can swipe specific element of android app using action chain.

Sunday, November 8, 2015

Appium - How To Swipe Vertical And Horizontal In Android Automation

Earlier In previous post, we learnt how to interact with android mobile gesture to perform drag and drop by generating action chain using TouchAction class of Webdriver 3. Swiping is another common action for any android mobile app. As you know, We can swipe horizontally(left to right or right to left) and swipe vertically(bottom to top and top to bottom) In android mobile app. Here I have described how to swipe horizontally and vertically In android mobile app using driver.swipe() when running appium automation test. Follow me throughout this article to learn how to swipe in android app using appium.

PREREQUISITES : Previous 19 steps(PART 1 and PART 2) of appium tutorials should be completed.

Download And Install SwipeListView Demo App
We will use SwipeListView Demo App for android swipe test using appium. You need to download and install SwipeListView Demo App in your android mobile device.
  • You can Download it from Google Play Store or THIS PAGE.
  • Install it in your android mobile device.
  • Open SwipeListView Demo App In your mobile device. It will show you alert message on screen.
  • Select "Don't show this message again" check box and click on OK button as shown in bellow image. Now this message will not display again when we run our test through appium.

  • It will show you list of apps in your android device. Using this app, You can swipe horizontal and vertical.
Aim To Achieve In This Appium Test
I have a 2 goals to achieve from this post in appium. 1. Horizontal swiping and 2. Vertical swiping in android app.

1. Horizontal Swiping In Android App
Using appium, We wants to swipe right to left and left to right horizontally as shown in bellow Image.


2. Vertical Swiping In Android App
Also we wants to swipe bottom to top and top to bottom vertically as shown in bellow Image.


This is our goal to achieve from this post.

Create And Run Appium Android Test Script To Swipe
I have prepared simple test to perform swipe on SwipeListView Demo android app as shown bellow. Create new class file driverSwipe.java and paste bellow given test script code in it.

driverSwipe.java
package Android;

import io.appium.java_client.android.AndroidDriver;

import java.net.URL;
import java.util.concurrent.TimeUnit;
import org.openqa.selenium.By;
import org.openqa.selenium.Dimension;
import org.openqa.selenium.remote.DesiredCapabilities;
import org.openqa.selenium.support.ui.ExpectedConditions;
import org.openqa.selenium.support.ui.WebDriverWait;
import org.testng.annotations.AfterTest;
import org.testng.annotations.BeforeTest;
import org.testng.annotations.Test;

public class driverSwipe {
AndroidDriver driver;
Dimension size;
@BeforeTest
public void setUp() throws Exception {
DesiredCapabilities capabilities = new DesiredCapabilities();
capabilities.setCapability("deviceName", "ZX1B32FFXF");
capabilities.setCapability("browserName", "Android");
capabilities.setCapability("platformVersion", "4.4.2");
capabilities.setCapability("platformName", "Android");
capabilities.setCapability("appPackage", "com.fortysevendeg.android.swipelistview");
capabilities.setCapability("appActivity","com.fortysevendeg.android.swipelistview.sample.activities.SwipeListViewExampleActivity");
driver = new AndroidDriver(new URL("http://127.0.0.1:4723/wd/hub"),capabilities);
driver.manage().timeouts().implicitlyWait(15, TimeUnit.SECONDS);
WebDriverWait wait = new WebDriverWait(driver, 300);
wait.until(ExpectedConditions.elementToBeClickable(By.className("android.widget.RelativeLayout")));
}

@Test
public void swipingHorizontal() throws InterruptedException {
//Get the size of screen.
size = driver.manage().window().getSize();
System.out.println(size);

//Find swipe start and end point from screen's with and height.
//Find startx point which is at right side of screen.

int startx = (int) (size.width * 0.70);
//Find endx point which is at left side of screen.
int endx = (int) (size.width * 0.30);
//Find vertical point where you wants to swipe. It is in middle of screen height.
int starty = size.height / 2;
System.out.println("startx = " + startx + " ,endx = " + endx + " , starty = " + starty);

//Swipe from Right to Left.
driver.swipe(startx, starty, endx, starty, 3000);
Thread.sleep(2000);

//Swipe from Left to Right.
driver.swipe(endx, starty, startx, starty, 3000);
Thread.sleep(2000);
}

@Test
public void swipingVertical() throws InterruptedException {
//Get the size of screen.
size = driver.manage().window().getSize();
System.out.println(size);

//Find swipe start and end point from screen's with and height.
//Find starty point which is at bottom side of screen.

int starty = (int) (size.height * 0.80);
//Find endy point which is at top side of screen.
int endy = (int) (size.height * 0.20);
//Find horizontal point where you wants to swipe. It is in middle of screen width.
int startx = size.width / 2;
System.out.println("starty = " + starty + " ,endy = " + endy + " , startx = " + startx);

//Swipe from Bottom to Top.
driver.swipe(startx, starty, startx, endy, 3000);
Thread.sleep(2000);
//Swipe from Top to Bottom.
driver.swipe(startx, endy, startx, starty, 3000);
Thread.sleep(2000);
}

@AfterTest
public void End() {
driver.quit();
}

}

swipingHorizontal() Method Description
In above test script, swipingHorizontal() method is responsible for horizontal swipe. Here,
  • driver.manage().window().getSize(); will find your device's screen size(Width X Height).
  • startx Is located at 70% (From left) of your device's screen width.
  • endx Is located at 30%  (From left) of your device's screen width.
  • starty Is located at the vertical middle of the screen.
  • First driver.swipe method will swipe from right side to left side as swipe start point(startx) is located at right side of the screen and end point(endx) is locate at left side of the screen. Here 3000 Is time in milliseconds to perform swipe operation. 
  • Second driver.swipe method will swipe from left side to right side as swipe start point(endx) is located at left side of the screen and end point(startx) is locate at right side of the screen.
  • Vertical point starty will remain steady as we are performing horizontal swipe.
swipingVertical() Method Description
swipingHorizontal() method is responsible for vertical swipe In above android automation script . Here,
  • starty Is located at 80% (From top) of your device's screen height.
  • endy Is located at 20%  (From top) of your device's screen height.
  • startx Is located at the horizontal middle of the screen.
  • First driver.swipe method will swipe from bottom to top as swipe start point(starty) is located at bottom side of the screen and end point(endy) is locate at top side of the screen. Here 3000 Is time in milliseconds to perform swipe operation. 
  • Second driver.swipe method will swipe from top side to bottom as swipe start point(endy) is located at top side of the screen and end point(starty) is locate at bottom side of the screen.
  • Horizontal point startx will remain steady as we are performing horizontal swipe.
I hope, Now you aware about how to run appium test script In android mobile device. Start appium server and run test script in eclipse and observe swipe operation in your android mobile screen.

This way you can swipe horizontal or vertical in any android application.

5 ways of String Concatenation in Java

In this tutorial, we will discuss about string concatenation in java. Although there can be number of ways for concatenating strings, we will discuss 5 most important and widely used . Take a look at below example of how string concatenation works:

Input: “Hello” and “World”
Output: “HelloWorld”


Input: “1234” and “5678”
Output: “12345678”

Read Also : 5 Ways to Reverse a String in Java with Example


Points to Keep in Mind Before attempting the Solution :

 1. String is immutable so once it is created in memory we will not be able to modify it rather than assigning new String. StringBuffer and StringBuilder are mutable, so once it is created , modifications can be done later.

 2. The first argument of String.join() method is delimiter used to join strings and there can any number of string arguments starting from second argument.


Each way has specific advantage and disadvantage, so use it according to your requirements.

Pseudo Code for Concatenating String Method 1 (Using + operator):

1. Take two String that need to be concatenated.
2. Concatenate both String and store into String object.
3. Print the result of concatenated Strings on console.


import java.lang.*;

public class concatenateString {
public static void main(String[] args) {
// First String as an Object
String str = "Hello";

// Concatenating and storing above String object and constant string
String result = str + "World";

// Print the result
System.out.println(result);

}}

Best Use:  When concatenating the constant strings.
Worst Use:  When using + operator inside loop.

Pseudo Code for Concatenating String Method 2 (Using String.concat() method):

1.  Take two String that need to be concatenated.
2.  Concatenate first String with Second string using concat() method and store into String object.
3.  Print the result of concatenated Strings on console.


import java.lang.*;

public class concatenateString {
public static void main(String[] args) {
// Two String objects
String str1 = "Hello";
String str2 = "World";

/* Using concat() method, concat first string with second string
and
        storing into result string */
      
String result = str1.concat(str2);

// Print the result
System.out.println(result);

}}

Best Use:   When concatenating string objects.
Worst Use: When using on dynamic objects, if str1 becomes null before concat() method it will throw NullPointerException.


Pseudo Code for Concatenating String Method 3 (Using StringBuffer):

 1. Take two String that needs to be concatenated.
 2. Append both String objects into StringBuffer object.
 3. Print the StringBuffer object.


import java.lang.*;

public class concatenateString {
public static void main(String[] args) {
// Two String objects
String str1 = "Hello";
     String str2 = "World";
// StringBuffer object StringBuffer sb = new StringBuffer();

     // Appending str1 and str2 
     sb.append(str1).append(str2); 
  
// Print the result
System.out.println(sb);

}}

Best Use:  When concatenating large number of string objects in multithreaded application.
Worst Use:  When creating StringBuffer object inside loop.

Pseudo Code for Concatenating String Method 4 (Using StringBuilder):

 1. Take two String that needs to be concatenated.
 2. Append both String objects into StringBuilder object.
 3. Print the StringBuilder object.


import java.lang.*;

public class concatenateString {
public static void main(String[] args) {
// Two String objects
String str1 = "Hello";
     String str2 = "World";
// StringBuilder object StringBuilder sb = new StringBuilder();

     // Appending str1 and str2 
     sb.append(str1).append(str2); 
  
// Print the result
System.out.println(sb);

}}


Best Use:   When concatenating large number of string objects in single threaded application.
Worst Use: When creating StringBuilder object inside loop or using in multithreaded application can lead unexpected result.

Pseudo Code for Concatenating String Method 5 (Using String.join() method of Java 8):

 1. Take two String that needs to be concatenated.
 2. Concatenate and store above Strings using String.join() method.
 3. Print the result String.


import java.lang.*;

public class concatenateString {
public static void main(String[] args) {
// Two String objects
String str1 = "Hello";
     String str2 = "World";
// Concatenation and storing str1 and str2 object StringBuffer result = String.join("", str1, str2);

     // Print the result
System.out.println(result);

}}


Best Use:  When concatenating strings with delimiter or an array of strings.
Worst Use:  When concatenating large number of Strings.


Please mention in the comments in case if you know any way for string concatenation in java other then the above mentioned ways.

Saturday, November 7, 2015

How to set JAVA_HOME (PATH) in Mac OS X 10.10 Yosemite

You can set JAVA_HOME in Mac OS X 10,10 or Yosemite by adding following command in your ~/.bash_profile file, as shown below:

export JAVA_HOME=`/usr/libexec/java_home` (remember backticks)
or
echo export "JAVA_HOME=\$(/usr/libexec/java_home -v 1.7)" >> ~/.bash_profile

This will append export "JAVA_HOME=\$(/usr/libexec/java_home -v 1.7)" into your bash_profile file. If you have set JAVA_HOME in UNIX then it's exactly similar to that.
Read more »

Wednesday, November 4, 2015

Top 10 Android Interview Questions Answers for Java Programmers

How many interview question do you prepare before going for any Android or Java interview? not many right. In this article, we will explore some of the most frequently asked Android interview questions. Android is very hot nowadays as its one of the top operating system for Mobile and Smartphone and the close rival to Apple's iOS. Android application developer job is in demand as well. I have also seen a couple of Java questions in Android interview as well. It means it's better to prepare some Java questions as well. Following Android Interview Questions are very basic in nature but appear frequently on beginners or Intermediate programmer level on various Android interview. I have not provided answers of this question as it can easily be found by doing the google. If needed I will update this Android interview questions with answers as well. These questions are good for recap and practice before going to Android interview.
Read more »

10 Frequently asked SQL Query Interview Questions

In this article, I am giving some examples of SQL queries which is frequently asked when you go for a programming interview, having one or two year experience on this field. Whether you go for Java developer position, QA, BA, supports professional, project manager or any other technical position, may interviewer expect you to answer basic questions from Database and SQL. It's also obvious that if you are working from one or two years on any project there is good chance that you come across to handle database, writing SQL queries to insert, update, delete and select records. One simple but effective way to check candidate's SQL skill is by asking these types of simple query. They are are neither very complex nor very big, but yet they cover all key concept a programmer should know about SQL.
Read more »

Tuesday, November 3, 2015

Appium Tutorial - Perform Drag And Drop In Android App

Drag And Drop Is one of the common action of any android app. You will see many android mobile apps where you can drag and drop element from one place to other place. If you are automating android mobile app where you have to perform drag and drop then you need to use TouchAction class. TouchAction class provides us facility to automate mobile gestures of android app using appium. Let's take very simple example to perform drag and drop operation on android application using appium.

PREREQUISITES : Previous 18 steps (Listed In PART 1 and PART 2) of appium tutorials should be completed.

Download Drag-Sort Demos app
We will use Drag-Sort Demos app to perform drag and drop operation in android device. You can download it from Google Play Store or THIS PAGE.

Create New Folder Under Project Folder To Store APK File
You need to create new folder "Apps" under your project folder and put downloaded Drag-Sort Demos's .apk file inside it.

To create new folder under project in eclipse,
  • Right click on project(MavenProject1 for me) folder -> New -> Folder.
  • Give folder name = Apps and click on Finish button. It will add Apps folder under project folder.
  • Copy-paste downloaded Drag-Sort Demos apk file inside it as shown in bellow image.

Drag-Sort Demos apk
Aim Of This Appium Android Test
Our appium automation test script will,
  • Install Drag Sort Demos app in android mobile device automatically.
  • Then It will launch Drag Sort Demos app in your android mobile device.
  • It will tap on "Basic usage playground" text.
Drag-Sort Demos app
  • Then It will locate and drag 3rd element and drop it to 6th position as shown in bellow images.
Before drag and drop
appium android - perform drag and drop

After drag and drop
appium - drag and drop element

This is our aim to achieve from bellow given test script.

Create And Run Test
Now you already knows what we wants to do In this test. Let's create and run test in eclipse.

PREREQUISITES :
  1. Android mobile device should be connected with PC with USB debugging mode enabled. View THIS POST.
  2. Drag-Sort Demos app should be there in Apps folder as described above.
  3. There should be enough free space in your mobile device to install Drag-Sort Demos app.
  4. appium node server should be launched and running mode. View THIS POST.
  5. TestNG should be installed in eclipse. View THIS POST.
Now create new class file DragAndDropAction.java under package(for me, package name is Android) of your project and copy paste bellow given test script in it.

Note : Please replace deviceName and platformVersion as per you actual in bellow given test.

DragAndDropAction.java
package Android;

import io.appium.java_client.MobileDriver;
import io.appium.java_client.TouchAction;
import io.appium.java_client.android.AndroidDriver;

import java.io.File;
import java.net.MalformedURLException;
import java.net.URL;
import java.util.concurrent.TimeUnit;
import org.openqa.selenium.WebElement;
import org.openqa.selenium.remote.DesiredCapabilities;
import org.testng.annotations.AfterTest;
import org.testng.annotations.BeforeTest;
import org.testng.annotations.Test;

public class DragAndDropAction {

//Object reference of AndroidDriver.
AndroidDriver driver;

@BeforeTest
public void setUp() throws MalformedURLException {

//Set Drag-Sort Demos app folder path. This statement will refer project's folder path.
File classpathRoot = new File(System.getProperty("user.dir"));

//Set folder name "Apps" where .apk file is stored.
File appDir = new File(classpathRoot, "/Apps");

//Set Drag-Sort Demos .apk file name.
File app = new File(appDir, "com.mobeta.android.demodslv-0.5.0-3_APKdot.com.apk");

// Created object of DesiredCapabilities class.
DesiredCapabilities capabilities = new DesiredCapabilities();

// Set android deviceName desired capability. Set your device name.
capabilities.setCapability("deviceName", "ZX1B32FFXF");

// Set BROWSER_NAME desired capability. It's Android in our case here.
capabilities.setCapability("browserName", "Android");

// Set android VERSION desired capability. Set your mobile device's OS version.
capabilities.setCapability("platformVersion", "4.4.2");

// Set android platformName desired capability. It's Android in our case here.
capabilities.setCapability("platformName", "Android");

//Set .apk file's path capabilities.
capabilities.setCapability("app", app.getAbsolutePath());

// Set app Package desired capability of Drag-Sort Demos app.
capabilities.setCapability("appPackage", "com.mobeta.android.demodslv");

// Set app Activity desired capability of Drag-Sort Demos app.
capabilities.setCapability("appActivity", "com.mobeta.android.demodslv.Launcher");

// Created object of AndroidDriver and set capabilities.
// Set appium server address and port number in URL string.
// It will launch Drag-Sort Demos app in emulator.

driver = new AndroidDriver(new URL("http://127.0.0.1:4723/wd/hub"), capabilities);
driver.manage().timeouts().implicitlyWait(15, TimeUnit.SECONDS);
}

@Test
public void dragDrop() {
//Tap on Basic usage Playground.
driver.findElementByName("Basic usage playground").click();

//Locate 3rd element(Chick Corea) from list to drag.
WebElement ele1 = (WebElement) driver.findElementsById("com.mobeta.android.demodslv:id/drag_handle").get(2);
//Locate 6th element to drop dragged element.
WebElement ele2 = (WebElement) driver.findElementsById("com.mobeta.android.demodslv:id/drag_handle").get(5);

//Perform drag and drop operation using TouchAction class.
//Created object of TouchAction class.

TouchAction action = new TouchAction((MobileDriver) driver);

System.out.println("It Is dragging element.");
//It will hold tap on 3rd element and move to 6th position and then release tap.
action.longPress(ele1).moveTo(ele2).release().perform();
System.out.println("Element has been droped at destination successfully.");
}

@AfterTest
public void End() {
// Quit
driver.quit();
}
}

Comments are already there with each sentence of test script. Let me describe you few Important class and methods which are used in above test script.
  • TouchAction : This is class of Webdriver 3 which provide different methods(longPress, moveTo, perform, press, tap, etc..) to automate mobile gestures like drag and drop, swipe etc. It will help us to generate action chain of different actions.
  • longPress : longPress is method to hold tap for long time on given element.
  • moveTo : moveTo is method to move action.
  • release : release is used to release from longPress tap action.
  • perform : perform will execute full action chain of drag and drop.
Also If you notice in above test script, We have used AndroidDriver at place of RemoteWebDriver as we are automating android app. And also used findElementByName("") and findElementsById("") methods at place of findElement(By.Name("")) and findElements(By.Id("")) methods.

Run above test using testng and observe Drag And Drop in your mobile device. 
  • It will launch Drag-Sort Demos app.
  • Tap on "Basic usage playground" text and
  • Perform draga and drop operation as shown in above Images.
This way we can automate mobile gestures in appium android automation test. Same thing you can do with any app.