Search

Tuesday, September 29, 2015

Locating Android App Elements Using UI Automator Viewer

In previous post we learnt how to enable developer option and USB debugging mode in android device to connect android device with PC. So next steps is to learn element locators for android app. Before learning about UI Automator Viewer, You must knows why we need it. To automate android app using appium, You should aware about how to locate elements of android app to use them in webdriver automation test scripts. Let's try to understand how can we locate elements of android app.

As you knows, We are going to automate native android apps so it is not possible to inspect them using fire-bug and fire-path which we can use to locate elements of web application as described in THIS POST. So here we need to use some other tool which can locate elements of android app.

What Is UI Automator Viewer?
UI Automator Viewer is a tool provided by android SDK. You can view THIS POST to know how to download and install android SDK in windows. UI Automator Viewer will provide you an user interface to scan and analyse UI components of android application. Using UI Automator Viewer, We can inspect the android app component hierarchy, Inspect properties of android app components and then we can use those element's properties to create xpath of element and use them in automation test scripts.

You will find uiautomatorviewer.bat file in tools folder of SDK. e.g. E:\SDK\tools.

PREREQUISITES : All PREVIOUS 8 STEPS of android environment configuration should be performed.

Inspecting App's UI Element Using UI Automator Viewer
We will use default and simple calculator app of android phone to learn how to inspect its's UI elements using UI Automator Viewer tool. Follow the steps given bellow.
  • Connect your android device with PC (USB debugging mode should be enabled) as described in THIS POST.
  • Run command "adb devices" in command prompt to verify device is connected properly with PC.
  • Run uiautomatorviewer.bat file from E:\SDK\tools folder. View THIS POST to know more about SDK folder. It will open UI Automator Viewer tool's UI as bellow.
  • Open Calculator application in your android phone. You can download Android Calculator App from THIS PAGE if it is not available with you.
  • In UI Automator Viewer, Click on Device Screenshot image button as shown in bellow image. (Before clicking on button please make sure Calculator app is open in your android phone and it is in active mode. Means phone is unlocked and you are able to see Calculator app on screen).
  • It will process to capture device screenshot.
  • After capturing screenshot of android phone screen, It will show your android phone's calculator's UI in UI Automator Viewer as bellow. 
  1. On left site it will show you calculator app's screenshot which is open in android device.
  2. Right side top part will show calculator app's UI element's hierarchy view. It will display node structure to explain how elements are arranged.
  3. Right side bottom part will show property detail of selected element.


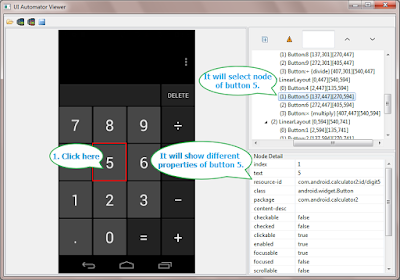
  • In calculator screenshot (which is display in UI Automator Viewer), Select button 5 to view it's different properties as shown in bellow image.

  • It is showing different properties of button 5 in right side node detail section which we can use to locate it using different element locating strategy. 
This way you can inspect any element of android native app using UI Automator Viewer. You just need to click on element and it will show you that element's relative property detail.NEXT POST will show you different ways(XPath, id, className) to locate android app elements.

Monday, September 28, 2015

Thread-safe Singleton in Java using Double Checked Locking Idiom

Singleton Pattern is one of the famous design patterns from the Gang of Four. Even though nowadays it is considered as an anti-pattern, it has served us well in the past. In Singleton pattern, a class has just one instance throughout its lifetime and that instance is shared between multiple clients. Singleton class has two responsibility, first to ensure that only instance of the class gets created and second, provide a method getInstance() so that everyone can get access to that single instance i.e. global access. One of the issue, faced by Singelton design pattern in the multi-threading program is to ensure that just one instance of the class gets created, even if multiple clients called getInstance() method same time. Many programmers solved this problem by making whole getInstance() method synchronized, which results in poor performance because every time a thread enters a synchronization method, it acquires the lock and while it's been inside the method, no other thread are allowed to enter, even if they are not creating instance and just accessing already created instance. How do you solve this problem? Well, you can use Double checked locking idiom, which you learn in this article. Btw, if you are curious about why Singleton is considered anti-pattern, I highly recommend the book Games Programming Patterns by Robert Nystrom, though examples are in C++, it's one of the most readable book on design pattern, you won't feel bored or cheated.
Read more »

Sunday, September 27, 2015

5 Difference between HashMap and WeakHashMap in Java with Example

In this post ,we will learn about the difference between HashMap and WeakHashMap in java with example. We will also look into the similarities between HashMap and WeakHashMap . I have already shared difference between HashMap and Hashtable in java.

Read Also :  Difference between HashMap and HashSet in java with Example


Difference between HashMap and WeakHashMap in Java with Example 

1. Entry object Garbage Collected :  In HashMap , entry object(entry object stores key-value pairs) is not eligible for garbage collection .In other words, entry object will remain in the memory even if the key object associated with key-value pair is null.

According to WeakHashMap Oracle docs ,
An entry in a  WeakHashMap will automatically be removed when its key is no longer in ordinary use (even having mapping for a given key will not prevent the key from being discarded by the garbage collector that is made finalizable , finalized and then reclaimed). When a key is discarded then its entry is automatically removed from the map , in other words, garbage collected.


2. Key objects Reference :  In HashMap key objects have strong(also called soft) reference.

Each key object in the WeakHashMap  is stored indirectly as the referent of a Weak reference(also called hard ) reference.
Therefore , a key will automatically be removed only after the weak references to it , both inside and outside of the map , have been cleared by the garbage collector. Check here for  the difference between strong and weak reference.

3. Automatic Size decrease : Calling size()  method on HashMap object will return the same number of key-value pairs. size will decrease only if remove() method is called explicitly on the HashMap object.

Because the garbage collector may discard keys at anytime, a WeakHashMap may behave as though an unknown thread is silently removing entries. So it is possible for the size method to return smaller values over time.So, in WeakHashMap  size decrease happens automatically.

4.  Clone method :   HashMap implements Cloneable interface . HashMap class clone() method returns the shallow copy of the object , although , keys and values themselves are not cloned.

WeakHashMap does not implement Cloneable interface , it only implements Map interface. Hence , there is no clone() method in the WeakHashMap class.


5. Serialize and Deserialize objects : HashMap implements Serializable interface . So HashMap class object state can be serialized or deserialized (i.e state of the HashMap object can be saved and again resume from the saved state).

WeakHashMap does not implement Serializable interface . As a result , WeakHashMap object will not have any of their state serialized or deserialized.(i.e state of the WeakHashMap object cannot be saved and again resume from the saved state).

Example of WeakHashMap and HashMap 


import java.util.Map;
import java.util.HashMap;
import java.util.WeakHashMap;
public class WeakHashMapExample { public static void main(String[] args) { 
 
           
        // Created HashMap and WeakHashMap objects

        Map hashmapObject = new HashMap();
        Map weakhashmapObject = new WeakHashMap();
        
       // Created HashMap and WeakHashMap keys

        String hashmapKey = new String ("hashmapkey");
        String weakhashmapKey = new String ("weakhashmapkey");

      // Created HashMap and WeakHashMap values

        String hashmapValue = "hashmapvalue";
        String weakhashmapValue = "weakhashmapvalue";  

      // Putting key and value in HashMap and WeakHashMap Object

        hashmapObject.put(hashmapKey ,hashmapValue); 
        weakhashmapObject.put(weakhashmapKey ,weakhashmapValue); 

      // Print HashMap and WeakHashMap Object : Before Garbage Collection
       
        System.out.println("HashMap before Garbage Collected :"+ hashmapObject);
        System.out.println("WeakHashMap before Garbage Collected :"+
weak
hashmapObject);

     // Set HashMap and WeakHashMap Object keys to null
        hashmapKey = null;  
        weakhashmapKey = null;

     // Calling Garbage Collection
        System.gc(); 

    // Print HashMap and WeakHashMap Object : After Garbage Collection
       
        System.out.println("HashMap after Garbage Collected :"+ hashmapObject);
        System.out.println("WeakHashMap after Garbage Collected :"+
                            weakhashmapObject); 
 }
}


Output :

HashMap before Garbage Collected :{hashmapkey=hashmapvalue}
WeakHashMap before Garbage Collected :{weakhashmapkey=weakhashmapvalue}
HashMap after Garbage Collected :{hashmapkey=hashmapvalue}
WeakHashMap after Garbage Collected :{}


When to Use WeakHashMap over HashMap 


difference between hashmap and weakhashmap with example

According to the  Effective Java Book,

WeakHashMap is useful only if the desired lifetime of cache entries  is determined by the external references to the key , not the value.
In short , WeakHashMap is useful for cache implementation .


Similarities between HashMap and WeakHashMap in Java

1. Null key and Null values :  Both classes (i.e WeakHashMap and HashMap ) permit null key and null values .

2. Performance : WeakHashMap class has the similar characteristics  as of the HashMap class and has the same efficiency parameters of initial capacity and load factor.

3. Not Synchronized : Both classes are not synchronized . Collections.synchronizedMap() can be used to synchronize both HashMap and WeakHashMap class.

4. Iterators returned by iterator method :  The iterators returned by the iterator method of  HashMap and WeakHashMap are fail-fast iterators. I have already discussed fail-safe vs fail-fast iterator with example.


Recap : Difference between HashMap and WeakHashMap in Java


HashMapWeakHashMap
Entry object Garbage CollectedNo ,even if key object is null Yes  
Key Object ReferenceStrongWeak
Automatic Size decreaseNo Yes
Clone methodYesNo
Serialize and Deserialize objects YesNo


Please mention in the comments in case you have any questions regarding the difference between HashMap and WeakHashMap in Java .

Saturday, September 26, 2015

Connect Android Device With PC In USB Debugging Mode To Run Appium Test

You need to connect real android device with PC in USB debugging mode in order to run android app automation tests in real android device using appium. Later on we will also learn how to run android app test in virtual device. First we will use actual android device which is connected with PC in USB debugging mode to run test. So you must know how to enable USB debugging mode in android device and connect with your PC.

PREREQUISITES : Previous 7 STEPS of appium configuration In windows should be completed.

Enable Developer Option In Android Device
Previously if you have not enabled "developer options" in your android device then once you need to enable it in order to switch device in USB debugging mode. Otherwise you can not access USB debugging mode in your device.

Verify Developer Option Is Enabled?
To check Developer Option is enabled or not,
  • Go to Settings.
  • Check if there is any option like "Developer Option"?
If Developer Option is enabled then it will display there. Otherwise follow the steps given bellow to enable it.

Enable Developer Option
To enable Developer Option in android device,
  • Go to Settings.
  • Scroll down to bottom and tap on About Phone.
  • Scroll down bottom again on About Phone screen. You will see option Build number.
  • Tap seven times on Build number option one by one. After 3 tap, It will start showing you message like.. "You are now 2 steps away from being a developer" as shown in bellow image.
  • After 7 times Build number option tap, It will show you message "You are now a developer!" as shown in bellow image.
  • Now go back to Settings and scroll down bottom.
  • You will see option Developer Options above About Phone as shown in bellow image.


Connect Device With PC And Start USB Debugging Mode
Note : Let me warn you before enabling USB debugging mode in your android device. Enable USB debugging only when you need it. Leaving it enabled all the time is kind of a security risk as it allows high-level access to your android device. So disable it immediately when you have not any usage of it.

To start USB Debugging mode,
  • Connect your device with PC using USB cable.
  • Go to Settings -> Developer options.
  • There will be option USB debugging with check box. Check it.
  • It will ask you to "Allow USB debugging?". Tap on OK.

It will enable USB debugging mode for your android device.

Verify Device Connected Properly With PC
To verify device is connected properly with PC with USB debugging mode,
  • Open command prompt in your PC.
  • Run command adb devices.


It will show you list of connected devices with your PC. If not display any device in list that means there is some issue with device connection or USB debugging mode is not enabled properly.

Note : If face any issue in android device detecting with PC, Please install PDANet+ for Android in your system as described in THIS POST.

This is the way to enable developer mode and USB debugging mode in your android device to connect it with PC in development environment. Now you can run native apps automation test in physical devices using appium and selenium webdriver. We will learn it in my upcoming posts. Next post will show you how to locate different elements of android native app using uiautomatorviewer.

How to check if a key exists in HashMap Java? Use containsKey()

One of the common programming task while using HashMap in Java is to check if a given key exists in the map or not. This is supposed to be easy, right? Yes, it is easy if you know your API well, all you need to is call the containsKey() method, it returns true if given key exists in HashMap, otherwise false; but I have seen many programmer's codes like we will see in this article, which prompted me to write this blog post.

if(map.get(key) !=  null){
    System.out.println("key exits in Map");
}

This code is fragile, it will not work if you have added null values into HashMap, remember HashMap does allow null values. Many programers will test this code for some input and think that it's working fine, only to create a subtle bug in production.  It's always better to use an API method if it can do the job, many greats have advised this. Joshua Bloch even included a chapter on his classic book Effective Java, a must-read book for any Java programmer.
Read more »

Thursday, September 24, 2015

6 ways to convert char to String in Java - Examples

If you have a char value e.g. 'a' and you want to convert it into equivalent String e.g. "a" then you can use any of the following 6 methods to convert a primitive char value into String in Java :

1) String concatenation
2) String.valueOf()
3) Character.toString()
4) Character wrapper class + toString
5) String constructor with char array
6) String.valueOf(char [])

In this article, we will see examples of each approach and learn a little bit more about it. Actually, there is lot of overlap between each method as some of them internally calls String.valueOf(), which eventually calls to a String constructor which accepts char array and creates a String object containing primitive char value with length 1. Once you know, how they work internally, it easy to decide which one is more efficient for purpose.
Read more »

Tuesday, September 22, 2015

How To Download And Install Appium In Windows With Steps

You must need to install appium if you need mobile apps automation testing. Till now, We have configured android development environment in windows to run appium automation tests on android devices and emulators and we have installed other required software for appium in previous post. Now we need to download and install appium in windows to run native/web ios/android automation tests using selenium webdriver. Bellow given steps will guide you to install appium in windows.

1. Download Appium
Before download and install appium in windows, Please make sure bellow given prerequisites are fulfilled.
  1. JDK Installed. View THIS POST.
  2. Android SDK Installed. View THIS POST.
  3. Set ANDROID_HOME and Path Environment Variables. View THIS POST.
  4. Eclipse ADT Plugin Installed. View THIS POST.
  5. Microsoft .Net Framework, Node JS and PDANet+ for Android Installed. View THIS POST.
For downloading appium in windows,
  • Go to THIS PAGE.
  • Click on Download Appium button.
  • It will download zip file.
  • When download completes, Extract zip file.You will get AppiumForWindows folder as shown bellow.
2. Install Appium
  • Open AppiumForWindows folder. "appium-installer.exe" file will be there.
  • Double click on "appium-installer.exe" file to install appium. It will start installing appium.
  • It will ask you to select setup language.
  • Select English and click on OK.
  • It will launch Appium Setup Wizard. Click on Next button.

  • Next screen will ask you to select appium destination location. Leave it as it is and click on Next.

  • Next screen will ask you to set name of appium. Leave it as it is and click on Next.
  • Click Next on Select Additional Tasks screen.
  • On Ready To Install screen, Click on Install button. It will start installation.
  • At the end of installation, It will show Completing the Appium Setup Wizard. Select Launch Appium check box and click on Finish button.
  • It will launch Appium as shown bellow.

Appium is installed and ready to use.

3. Configure Appium
Appium will launch with default configuration parameters. To reduce errors during test execution, You need to set/modify few appium parameters as per your requirement if they are wrong or not set properly. See bellow.

Android Settings :
  • Click on Android Settings button as shown in bellow image.
  • Select Platform Name = Android
  • Select Automation Name = Appium
  • Select PlatformVersion = Your android device's OS version. For me it is 4.2 Jelly Bean.

General Settings
  • Click on General Settings button as shown in bellow image.
  • Note down Server Address and Post number. We need it during appium test script creation. Server Address is : 127.0.0.1 and Port number is : 4723.
  • Un-check Pre-Launch Application check box if it is checked.


Leave all other settings as it is.

Monday, September 21, 2015

60+ Java Interview Questions for Quick Revision

Java Interviews are very different than traditional software developer interviews. You can clear a Java interview without even writing a single line of code, Yes, this is true, you can become a Java developer without someone asking you to write a function in Java interview. Though, it's not the case everywhere and many companies are increasingly including coding test in their Java developer interview process, but there are many companies and start-ups where you can get a Java job without writing a single line of code. All you need to do is memorize those standard Java questions, which has been asked from ages and mostly test the theoretical knowledge of the candidate. This is great for candidates which lack hands-on coding experience, but sometimes this style of the interview can cost you good developers who are not good at interviews. Someone, who knows how to structure a complex program, knows how to model their class and objects, can write good, robust code but fail to answer questions like, Why String is Immutable? or How HashMap works in Java?
Read more »

Saturday, September 19, 2015

Install Other Required Software For Appium Configuration

In previous steps, we learnt how to integrate android SDK with eclipse using ADT plugin. Before installing appium, Please make sure bellow given software are installed in your system. If bellow given software are not installed in your system then it can create problem on any stage of android app automation testing process. So I recommend you to Install Microsoft .Net Framework, Node JS and PDANet+ for Android(optional) in your system. Please me show you quickly how to install them.

PREREQUISITES : All previous 5 STEPS of appium environment configuration should be completed. 

Download And Install Microsoft .Net Framework
If Microsoft .Net Framework Is not installed then follow bellow given steps.

Download
To download Microsoft .Net Framework,
  • Search for "download latest version of Microsoft .Net Framework" keyword In google.
  • It will show you latest version download link as bellow.

  • It will take you to Microsoft .Net Framework latest version download page.
  • Current latest version is Microsoft .NET Framework 4.5.
  • Click on download button. It will download .exe file to install Microsoft .Net Framework(e.g. dotNetFx45_Full_setup.exe).

Install
  • Double click on .Net framework installation .exe file.
  • It will open .Net framework installation dialog.
  • Proceed for installation with default selected options and settings on each screen of installation dialog.
Download And Install Node JS
Follow bellow given steps to download and install Node JS

Download
To download Node JS
  • Go to Node JS DOWNLOAD PAGE.
  • Download Windows Installer (.msi) file as per your system(32 bit or 64 bit).
  • It will download Node JS installation .msi file(e.g. node-v0.12.7-x86.msi).
Install
  • Double click on Node JS installation .msi file.
  • It will open Node JS installation dialog.
  • Proceed for installation with default selected options and settings on each screen of installation dialog.
Download And Install PDANet+ for Android
Note : You need to install this software only if you not able to detect your connected device in PC. Later on we will learn how to connect device with PC in THIS POST. Right now skip this software installation and install it only if you face any problem in detecting device in PC.

Download
  • Click on Download button. It will take you to PDANet+ for Android download link page.

  • Click on download link as shown in above image. It will download installation file (e.g. : PdaNetA4181.exe).
Install
  • Connect your android phone with PC with USB debugging mode enabled.
  • Double click on PDANet+ installation .exe file.
  • It will open PDANet+ installation dialog.
  • Proceed for installation with default selected options and settings on each screen of installation dialog.

Thursday, September 17, 2015

How to use BigInteger class in Java? Large Factorial Example

When you calculate factorial of a relatively higher number most of the data type in Java goes out of their limit. For example, you cannot use int or long variable to store factorial of a number greater than 50. In those scenarios where int and long are not big enough to represent an integral value, you can use java.math.BigInteger class. BigInteger variable can represent any integral number, there is no theoretical limit, but it allocates only enough memory required to hold all the bits of data it is asked to hold. There is not many time you need this class but its good to know about it and that's why I am giving one scenario which is perfectly suitable for using BigInteger class. In this article, you will learn how to calculate factorial of large number using BigInteger object. We will use same formula, we have used to calculate normal factorials as discussed in my previous post about factorials.
Read more »

Tuesday, September 15, 2015

Steps To Install Eclipse ADT Plugin To Use Android SDK With Eclipse

5Earlier we learnt how to install android SDK in THIS POST and set ANDROID_HOME and Path variable in THIS POST to set android development and app test environment in windows. Now this is time to integrate android SDK with eclipse IDE to access SDK tools in eclipse IDE. Android offers plugin called Android Developer Tools (ADT) to integrate android development environment in eclipse IDE. After installing ADT in eclipse, You can setup android project, debug apps and build apps.

However we CAN use it to launch android emulators through eclipse to run automation tests on it using appium. Also you can launch android virtual devices(Emulator) direct from SDK folder -> AVD Manager.exe. So this is optional step but still let me describe you how to do it if you wish to launch AVD Manager from eclipse.

Download And Installing ADT plugin in eclipse
Bellow given steps will describe you how to install ADT plugin in eclipse.

PREREQUISITES
Bellow given tools/components should be available/installed
Steps to install ADT plugin in eclipse IDE.
  • Open eclipse IDE
  • Go to Help -> Install New Software. It will open Install software dialog.
  • Click on Add button as shown in bellow image. It will open Add Repository dialog.


  • Set URL "https://dl-ssl.google.com/android/eclipse/" in Location text box and click on OK button as shown in above snap. It will load Developer Tools with check box.
  • Select all check box of developer tools as shown in bellow image and click on Next button. It will take you to installation details.
  • Click on Next button as shown in bellow image. It will take you to Review Licenses screen.
  • On Review Licenses screen, Select I accept the terms of the license agreement option and click on Finish button as shown bellow.
  • It will start installing ADT plugin as shown bellow.
  • On completion of ADT plugin, It will ask you to restart eclipse IDE. Click on Yes to restart eclipse IDE.

ADT Plugin is installed in eclipse

Set SDK Location
You need to set SDK folder path after installation of ADT plugin which enables eclipse to integrate with android development environment. Follow the steps given bellow.
  • Open eclipse IDE Preferences dialog from Windows -> Preferences.


  • Select Android on Preferences dialog.
  • Set SDK folder path in SDK Location box. SDK folder is located in my E: drive which contain all android SDK related stuff. View THIS POST for more detail on SDK folder.

Verify Android SDK configured properly with eclipse
To verify if android SDK is integrated properly or not
  • Go to Eclipse IDE's Windows menu -> Select Android SDK Manager.
  • It will open Android SDK Manager dialog as shown bellow.

This confirms that android SDK is integrated properly with eclipse IDE using ADT plugin.

Monday, September 14, 2015

Top 10 Algorithm books Every Programmer Should Read

Algorithms are language agnostic and any programmer worth their salt should be able to convert them to their language of choice. Unfortunately, I have come across several programmers who are REALLY good on programming language e.g. Java, knows minor details of API and language intricacies but has very poor knowledge of algorithms. Ask them to right popular sorting algorithms e.g. quicksort and they will fall apart. Expecting them to know of about more complex algorithm e.g. String, graph, tree or greedy algorithms. Once, I have asked a very good candidate who was good in Java, multi-threading but his data structure and algorithm skill was really poor to his experience and caliber.  I asked him, why he didn't spent time brushing his algorithm and problem solving skill before coming to interview? His excuse was "those algorithms are just for interviews and never really used in practical coding. I have never used them in my 6 years of Java development career". He was right, but he failed to recognize the more long term improvement algorithm and data structure do in improving programming skill. They are tool of developing programming solving skill and coding sense, which is required to convert a user requirement into line of code also known as computer program.
Read more »

Sunday, September 13, 2015

How LinkedHashSet Works Internally in Java

I have already discussed  how HashSet works internally in Java . In this post we will understand how HashSet subclass i.e LinkedHashSet works internally in java. Just like HashSet internally uses HashMap to add element to its object similarly LinkedHashSet internally uses LinkedHashMap to add element to its object . Internal working of LinkedHashSet includes two basic questions ,first, How LinkedHashSet maintains Unique Elements ?, second , How LinkedHashSet maintains Insertion Order ? . We will find out the answers of the above questions in this post.


What is LinkedHashSet ?

According to Oracle docs ,

LinkedHashSet is the Hashtable and  linked list implementation of the Set interface with predictable iteration order.
The linked list defines the iteration ordering, which is the order in which  elements were inserted into the set. Insertion order is not affected if an element is re-inserted into the set.


Read Also :   How TreeMap works internally  in java


Why we need LinkedHashSet when we already have the HashSet and TreeSet ?

HashSet and TreeSet classes were added in jdk 1.2  while LinkedHashSet was added to the jdk in java version 1.4

HashSet provides constant time performance for basic operations like (add, remove and contains) method but elements are in  chaotic ordering i.e unordered. 

In TreeSet elements are naturally sorted but there is increased cost associated with it . 

So , LinkedHashSet is added in jdk 1.4 to maintain ordering of the elements without incurring increased cost.


How LinkedHashSet Works Internally in Java ?

Before understanding how LinkedHashSet works internally in java in detail, we need to understand two terms initial capacity and load factor .

What is Initial capacity  and load factor?

The capacity is the number of buckets(used to store key and value) in the Hash table , and the initial capacity is simply the capacity at the time  Hash table is created.

The load factor is a measure of how full the Hash table is allowed to get before its capacity is automatically increased.


Constructor of LinkedHashSet depends on above two parameters  initial capacity and load factor .


There are four constructors present in the LinkedHashSet class . 

All constructors have the same below pattern :

    // Constructor 1

     public LinkedHashSet (int initialCapacity , float loadFactor)
    {
super(initialCapacity , loadFactor , true);
}


Note : If initialCapacity or loadFactor parameter value is missing during LinkedHashSet object creation , then default value of initialCapacity or loadFactor is used .
Default value for initialCapacity : 16    ,
Default value for loadFactor        : 0.75f

For example,

check the below overloaded constructor , loadFactor is missing in the LinkedHashSet constructor argument. So during super() call , we use the default value of the loadFactor(0.75f).
   
    // Constructor 2

     public LinkedHashSet (int initialCapacity)
    {
super(initialCapacity , 0.75f , true);
}


check the below overloaded constructor , initialCapacity and loadFactor both are missing in the LinkedHashSet constructor argument. So during super() call , we use the default value of both initialCapacity(16) and loadFactor(0.75f).

    // Constructor 3

     public LinkedHashSet ()
    {
super(16 , 0.75f , true);
}


below is the last  overloaded constructor which uses Collection  in the LinkedHashSet constructor argument. So during super() call , we use the default value of  loadFactor(0.75f).

    // Constructor 4

     public LinkedHashSet (Collection c)
    {
super(Math.max(2*c.size() ,11) , 0.75f , true);
}


Note : Since LinkedHashSet extends HashSet class.
Above all the  4 constructors are calling the super class (i.e HashSet ) constructor , given below


         public HashSet (int initialCapacity , float loadFactor , boolean dummy)
    {
1. map = new LinkedHashMap<>(initialCapacity , loadFactor);
}


In the above HashSet constructor , there are two main points to notice :

a.  We are using extra boolean parameter  dummy . It is used to distinguish other int, float constructors present in the HashSet class.


b. Internally it is creating a LinkedHashMap object passing the initialCapacity and loadFactor as parameters.


How  LinkedHashSet Maintains Unique Elements  ?


public class HashSet<E>
extends AbstractSet<E>
implements Set<E>, Cloneable, java.io.Serializable

{
private transient HashMap<E,Object> map;

// Dummy value to associate with an Object in the backing Map

private static final Object PRESENT = new Object();


public HashSet(int initialCapacity , float loadFactor , boolean dummy) {

         map = new LinkedHashMap<>(initialCapacity , loadFactor); 
    }

// SOME CODE ,i.e Other methods in Hash Set


public boolean add(E e) {
        return map.put(e, PRESENT)==null;
    }


// SOME CODE ,i.e Other methods in Hash Set
}


So , we are achieving uniqueness in LinkedHashSet,internally in java  through LinkedHashMap . Whenever you create an object of LinkedHashSet it will indirectly create an object of LinkedHashMap as you can see in the italic lines  of HashSet constructor.


Read Also :   How LinkedHashMap works Internally in Java


As we know in LinkedHashMap each key is unique . So what we do in the LinkedHashSet is that we pass the argument in the add(Elemene E) that is E as a key in the LinkedHashMap . Now we need to associate some value to the key , so what Java apis developer did is to pass the Dummy  value that is ( new Object () ) which is referred by Object reference PRESENT .

So , actually when you are adding a line in LinkedHashSet like  linkedhashset.add(5)   what java does internally is that it will put that element E here 5 as a key in the LinkedHashMap(created during LinkedHashSet object creation) and some dummy value that is Object's object is passed as a value to the key .

Since LinkedHashMap put(Key k , Value v ) method does not have its own implementation . LinkedHashMap put(Key k , Value v ) method uses HashMap put(Key k , Value v ) method.

Now if you see the code of the HashMap put(Key k,Value v) method , you will find something like this

 public V put(K key, V value) {
//Some code
}

The main point to notice in above code is that put (key,value) will return

1.  null , if key is unique and added to the map
2.  Old Value of the key , if key is duplicate

So , in LinkedHashSet add() method ,  we check the return value of map.put(key,value) method with null value
i.e.

   public boolean add(E e) {
            return map.put(e, PRESENT)==null;
       }

So , if map.put(key,value) returns null ,then
map.put(e, PRESENT)==null      will return true and element is added to the LinkedHashSet.


So , if map.put(key,value) returns old value of the key ,then
map.put(e, PRESENT)==null      will return false and element is  not added to the LinkedHashSet .


How LinkedHashSet Maintains Insertion Order ?

LinkedHashSet differs from HashSet because it maintains the insertion order .
According to LinkedHashSet Oracle docs ,

LinkedHashSet implementation differs from HashSet in that it maintains a doubly-linked list running through all of its entries

LinkedHashSet internally uses LinkedHashMap to add elements to its object.

What is Entry object?

LinkedHashMap consists of a static inner class named as Entry . Each object of Entry represents a key,value pair. The key K in the Entry object is the value which needs to be added to the LinkedHashSet object. The value V in the Entry object is any dummy object called PRESENT.


Insertion Order of the LinkedHashMap is maintained by  two Entry fields head and tail , which stores the head and tail of the doubly linked list.

  transient LinkedHashMap.Entry  head;
  transient LinkedHashMap.Entry  tail;


For double linked list we need to maintain the previous and next Entry objects for each Entry object .
Entry fields before and after are used to store the references to the previous and next Entry objects .


static class Entry extends HashMap.Node {

Entry before, after ;
    Entry( int hash , K key , V value , Node next ) {
     super(hash,key,value,next);
    }
}


Please mention in the comments in case if you have any questions regarding how LinkedHashSet works internally in Java