Search

Monday, March 30, 2015

8 Difference between Array and ArrayList in Java with Example

Difference between array and arraylist in java  is  considered as a starting interview question . This question checks whether candidate know about static and dynamic nature of array.We have already discussed other popular java interview questions like difference between comparable and comparator and difference between arraylist and vector . Difference between array and arraylist in java  include eight points namely Resizable, Performance, Traversal ,Primitives , Length , Type-Safety, Adding elements , Multi-dimensional.


Read Also :  Difference between HashSet and TreeSet


Difference between Array and ArrayList in Java with Example

1. Resizable :   Array is static in size that is fixed length data structure, One can not change the length after creating the Array object.
ArrayList is dynamic in size . Each ArrayList object  has instance variable capacity which indicates the size of the ArrayList. As elements are added to an ArrayList its capacity grows automatically.

2. Performance : Performance of Array and ArrayList depends on the operation you are performing :

resize() opertation : Automatic resize of ArrayList will slow down the performance as it will use temporary array to copy elements from the old array to new array.
ArrayList is internally backed by Array during resizing  as it calls the native implemented method System.arrayCopy(src,srcPos,dest,destPos,length) .


add() or get() operation : adding an element or retrieving an element from the array or arraylist object has almost same  performance , as for ArrayList object these operations  run in constant time.

3. Primitives :  ArrayList can not contains primitive data types (like int , float , double) it can only contains Object while Array can contain both primitive data types as well as objects.
One get a misconception that we can store primitives(int,float,double) in ArrayList , but it is not true 

Suppose we have ArrayList object ,

ArrayList  arraylistobject = new ArrayList();
arraylistobject.add(23);  // try to add 23 (primitive)

JVM through Autoboxing(converting primitives to equivalent objects internally) ensures that only objects are added to the arraylist object.
thus , above step internally works like this :

arraylistobject.add( new Integer(23));       
// Converted int primitive to Integer object and added to arraylistobject  


Difference between Array and Arraylist in Java with Example
4. Iterating the values : We can use iterator  to iterate through ArrayList . The iterators returned by the ArrayList class's iterator and listiterator method are fail-fast.  We can use for loop or for each loop to iterate through array . 

5. Type-Safety :  In Java , one can ensure Type Safety through Generics. while Array is a homogeneous data structure , thus it will contain objects of specific class or primitives of specific  data type. In array if one try to store the different data type other than the specified while creating the array object , ArrayStoreException is thrown.

for example :

String temp[] =  new String[2];  // creates a string array of size 2
temp[0] = new Integer(12); // throws ArrayStoreException, trying to add Integer object in String[] 


6. Length :  Length of the ArrayList is provided by the size() method while Each array object has the length variable which returns the length of the array.

for example :

Integer arrayobject[] = new Integer[3];
arraylength= arrayobject.length   ;  //uses arrayobject length variable


ArrayList  arraylistobject = new ArrayList();
arraylistobject.add(12);
arraylistobject.size();   //uses arraylistobject size method


7. Adding elements : We can insert elements into the arraylist object using the add() method while  in array we insert elements using the assignment operator.


for example :

Integer addarrayobject[] = new Integer[3];
addarrayobject[0]= new Integer(8)   ;  //new object is added to the array object


8. Multi-dimensional :  Array can be multi dimensional , while ArrayList is always single dimensional.

example of multidimensional array:

Integer addarrayobject[][] = new Integer[3][2];
addarrayobject[0][0]= new Integer(8)  


Example of Array and ArrayList 
 

import java.util.ArrayList;
import java.util.Iterator;

public class ArrayArrayListExample {

public static void main(String[] args) { 
 
        // ArrayList Example   
  
        ArrayList<String> arrlistobj = new ArrayList<String>();
arrlistobj.add("Alive is awesome");
arrlistobj.add("Love yourself");
        Iterator it = arrlistobj.iterator();
        System.out.print("ArrayList object output :");  
        while(it.hasNext())         
          System.out.print(it.next() + " ");


        // Array Example
 
        String[] arrayobj = new String[3];
arrayobj[0]= "
Love yourself";
arrayobj[1]= "Alive is awesome";
        arrayobj[2]= "Be in Present"; 
        System.out.print("Array object output :");
        for(int i=0; i < arrayobj.length ;i++)
        System.out.print(arrayobj[i] + " ");   
 
 }
}


Output :  ArrayList object output :{ Alive is awesome , Love yourself }
                 Array object output :{ Love yourself , Alive is awesome, Be in present}


Similarities Between Array and ArrayList

1. add and get method : Performance of Array and ArrayList are similar for the add and get operations .Both operations runs in constant time.

2. Duplicate elements : Both array and arraylist can contain duplicate elements.

3. Null Values : Both can store null values and uses index to refer to their elements.

4. Unordered :  Both does not guarantee ordered  elements.


Recap : Difference between Array and ArrayList in Java 


ArrayArrayList
ResizableNoYes
PrimitivesYesNo
Iterating valuesfor, for eachIterator , for each
Lengthlength variablesize method
PerformanceFastSlow in comparision
MultidimensionalYes No
Add ElementsAssignment operator add method


In case you have any doubts regarding the difference between array and arraylist  in java then please mention in comments.

Sunday, March 29, 2015

How To Download And Install Apache Maven In Windows System

Earlier we learnt how to download and Install Maven In eclipse IDE In THIS POST. Another way of using maven with your selenium project Is download It and configure It In windows system Instead of eclipse. There Is nothing to Install but you just need to configure It In your windows system and then you can use It easily for your selenium java project. It Is very easy process. Follow the steps given bellow to configure Maven In eclipse.

Step 1 : Download and Install Java, Set JAVA_HOME Environment variable
First of all, You need to download and Install java In your system. You can view THIS POST to know from where to download java and how to set JAVA_HOME environment variables.

After java Installation and environment variable setting, You need to check that java Is Installed properly or not. To check It, Run java -version command In command prompt as bellow. It will show you java version number. That means java Is Installed properly In your system.


Step 2 : Download Maven
After successful java Installation, You need to download maven from official website of maven. You will find maven download link on THIS SITE. Click on apache-maven-3.2.5-bin.zip link(Maven version may change In future) to download maven as shown In bellow Image,


It will download Maven In zip folder. Extract the folder, You will get folder like "apache-maven-3.2.5" from It based on your downloaded maven version.

Step 3 : Set environment variable for maven
To set maven environment variable, 

  1. Go to your system properties window by right clicking on computer Icon. It will open window as shown In bellow Image.
  2. Click on Advanced system settings. It will open system properties window.
  3. From advanced tab, Click on Environment Variable button. It will open Environment Variable window.
  4. In Environment Variable window, Click New button In System variable section. It will open New System Variable popup.
  5. In New System Variable popup, Enter variable name = M2_HOME and Variable Value = path of apache-maven-3.2.5 folder.  For me It Is "E:\Help and jar files\apache-maven-3.2.5". Then click on OK button. It will set environment variable for maven as shown In bellow Image.


Step 4 : Set Path variable
You needs to set path variable for maven. You will find path variable In Environment Variable popup. You need to set maven bin folder path In path variable as bellow. To set It, Select Path variable and click on Edit button. It will open Edit System Variable popup. Add ;(semicolon) and then maven bin folder path at end of path variable string. 

For me It Is ;E:\Help and jar files\apache-maven-3.2.5\bin


After set path variable, click on OK button. Then close all popup by clicking on OK buttons. Maven configuration part Is over now.

Verify maven configured/Installed properly or not
To verify that maven Is configured properly or not, You need to run bellow given command In command prompt. It will show you maven version as shown In bellow Image. That means maven Is Installed properly In windows.
mvn -version

Now maven Is configured properly In my windows system. Next post will describe you how to create/setup maven project from command prompt for selenium test.

Tuesday, March 24, 2015

Closing All Tabs Using Robot Class In Selenium WebDriver

Earlier we learnt how to work with multiple window tabs In single browser window In selenium WebDriver In THIS POST. Now supposing there are multiple tabs open In browser window and you wants to close all of them In one shot then how you will do It? Simple way Is using driver.quit();
method of selenium WebDriver. Can we do It using any other way? Yes.

Earlier we have used java robot class to save Image from page In THIS POST. Robot class Is useful to send key-press and key-release events. We will use same thing here to perform keyboard ALT + SPACE + "c" (Shortcut key)  key-press events to close all tabs of browser. We can perform this key-press event sequence very easily using Robot class. I am suggesting you to use always WebDriver's driver.quit(); method to close all tabs of browser. Intention of this post Is to make you more aware about Robot class usage with selenium WebDriver so you can perform such tricky actions easily whenever required.

Bellow given example has used Robot class In @AfterTest method to close browser tabs using ALT + SPACE + 'c' key-press event sequence. Run It In your eclipse IDE to check how It works.

package Testing_Pack;

import java.awt.AWTException;
import java.awt.Robot;
import java.awt.event.KeyEvent;
import java.util.concurrent.TimeUnit;
import org.openqa.selenium.By;
import org.openqa.selenium.Keys;
import org.openqa.selenium.WebDriver;
import org.openqa.selenium.firefox.FirefoxDriver;
import org.testng.annotations.AfterTest;
import org.testng.annotations.BeforeTest;
import org.testng.annotations.Test;

public class Tabs {

WebDriver driver;
Robot rb;

@BeforeTest
public void setup() throws Exception {
driver = new FirefoxDriver();
driver.manage().window().maximize();
driver.manage().timeouts().implicitlyWait(5, TimeUnit.SECONDS);
driver.get("http://only-testing-blog.blogspot.in/2014/04/calc.html");
}

@Test
public void openTab() {
driver.findElement(By.cssSelector("body")).sendKeys(Keys.CONTROL +"t");
driver.get("http://only-testing-blog.blogspot.in/2014/05/form.html");
switchToTab();
driver.findElement(By.xpath("//input[@id='6']")).click();
driver.findElement(By.xpath("//input[@id='plus']"));
driver.findElement(By.xpath("//input[@id='3']"));
driver.findElement(By.xpath("//input[@id='equals']"));

switchToTab();
driver.findElement(By.xpath("//input[@name='FirstName']")).sendKeys("hi");
driver.findElement(By.xpath("//input[@name='LastName']")).sendKeys("test");

switchToTab();
String str = driver.findElement(By.xpath("//input[@id='Resultbox']")).getAttribute("value");
System.out.println("Sum result Is -> "+str);
}

public void switchToTab() {
driver.findElement(By.cssSelector("body")).sendKeys(Keys.CONTROL +"\t");
driver.switchTo().defaultContent();
}

@AfterTest
public void closeTabs() throws AWTException {
//Used Robot class to perform ALT + SPACE + 'c' keypress event.
rb =new Robot();
rb.keyPress(KeyEvent.VK_ALT);
rb.keyPress(KeyEvent.VK_SPACE);
rb.keyPress(KeyEvent.VK_C);
}
}

This way we can use Robot class to perform keyboard shortcut key operations.

How to Remove Duplicates from ArrayList in Java

ArrayList is the most popular implementation of List interface from Java's Collection framework, but it allow duplicates. Though there is another collection called Set which is primarily designed to store unique elements, there are situations when you receive a List e.g. ArrayList in your code and you need to ensure that it doesn't contain any duplicate before processing. Since with ArrayList you cannot guarantee uniqueness, there is no other choice but to remove repeated elements from ArrayList. There are multiple ways to do this, you can follow the approach we used for removing duplicates from array in Java, where we loop through array and inserting each element in a Set, which ensures that we discard duplicate because Set doesn't allow them to insert, or you can also use remove method of ArrayList to get rid of them, once you found that those are duplicates, but the simplest approach to remove repeated objects from ArrayList is to copy them to a Set e.g. HashSet and then copy it back to ArrayList. This will remove all duplicates without writing any more code. One thing to noted is that, if original order of elements in ArrayList is important for you, as List maintains insertion order, you should use LinkedHashSet because HashSet doesn't provide any ordering guarantee. BTW, if you are using deleting duplicates while iterating, make sure you use Iterator's remove() method and not the ArrayList one to avoid ConcurrentModificationException.  In this tutorial we will see this approach to remove duplicates.
Read more »

Sunday, March 22, 2015

Install WebDriver Element Locator Add-On To Get XPath Of Element Easily

As you know, XPath Is most Important element locator to automate you web application using selenium WebDriver. There are many other locators are also available In WebDriver but If you don't know about XPath locator then It will be very hard for you to prepare WebDriver test cases. Earlier we learnt how to find XPath of element manually In THIS POST

Finding XPath manually Is time consuming process and WebDriver Element Locator Firefox add-on can help you to get element's XPath very easily. If you will use this add on then you do not need to Inspect element using firebug but you will get It In just two clicks. I am using this add-on from very long time and It helps me very much so let me tell you how to Install and use It If any one of you want It. Mean time you can read how to install firebug and firepath add-ons in firefox browser to get xpath of any element in THIS POST.

Steps to download and Install WebDriver Element Locator Add-On
If you have Installed any firefox add-on before then you will be well aware about Installation process. Ok.. let me tell you how to Install It.

  • Open Firefox Browser.
  • Go to https://addons.mozilla.org/en-US/firefox/. You will sind add-ons search box at top right corner of that page.
  • Search for add on using "WebDriver Element Locator" keyword. It will show you list of add on In search result.
  • Click on "Add to Firefox" button of "WebDriver Element Locator" add on as shown In bellow Image.
  • It will show you popup to Install "WebDriver Element Locator" add on. Click on Install Now button as bellow. It will start Installing add on.


  • At the end of Installation, It will show you add on successfully Installed message as bellow. That means add on Is Installed successfully. You can view Installed add on at Firefox browser menu -> Tools -> Add ons -> Extension section.

How to get Element's XPath using add on
Now you can get any element's XPath In just two clicks. Follow the steps given bellow to get XPath of Google search box.
  • Open http://www.google.com/ In Firefox browser.
  • Right click on Google search text box. It will show you multiple language options (C# Locators, Java Locators, Python Locators, Ruby Locators etc.) to get xpath syntax of Google search box as bellow. You can select language as per your requirement. I am using Java so I need XPath string In java compatible format.
  • As sown In above Image, It will show you many XPath syntax for Google searchbox when move mouse on Java Locators. XPath syntax marked with YES sign will work properly In your script so click on any of the XPath syntax to copy It.
  • Now you can paste It In your eclipse IDE directly and use It In your script.
This way you can get any web element's XPath In just two clicks as shown above using WebDriver Element Locator Add-On.

Saturday, March 21, 2015

How Remove Method Works Internally in HashMap with Example

This is one of the new hottest  technical java interview  question, how remove method works  internally in hashmap or explain the internal implementation of remove method in hashmap. Thanks to one of the Java Hungry readers Sarika , for pointing out this question. If you do not know how hashmap works in java , then please read it before reading this post.

Read Also :   How ConcurrentHashMap works internally in Java

How Remove method works internally in Java

 In HashMap we need key and value to add element to the HashMap object.
So if we add element to the HashMap object then the code will be like this :

public class JavaHungry {

public static void main(String[] args)
{
HashMap hashmap = new HashMap();
hashmap.put("Java", 1);
hashmap.put("Hungry" , 2);
hashmap.put("Blogspot" , 3);

Iterator iteratorobject = hashmap.keySet().iterator();
while(iteratorobject.hasNext()){
String hashmapkey = iteratorobject.next();
System.out.print(hashmap.get(hashmapkey));
}
}
}


It will print the result :  [321]

Remember the result can be any order , so if you run the above code , then output could also be
[123] [231] [132] [213] [312]
as the HashMap is unordered.


Till now , we have added three key-value pairs to the hashmap object , now let us remove one key-value pair from the hashmap object.


public class JavaHungry {

public static void main(String[] args)
{
HashMap hashmap = new HashMap();
hashmap.put("Java", 1);
hashmap.put("Hungry" , 2);
hashmap.put("Blogspot" , 3);
hashmap.remove("Java");
 
        Iterator iteratorobject = hashmap.keySet().iterator(); 
while(iteratorobject.hasNext()){
String hashmapkey = iteratorobject.next();
System.out.print(hashmap.get(hashmapkey));
}
}
}


It will print the result :  [32] 


As HashMap is unordered , the result could also be [23] but the main point to note that hashmap.remove("Java")  would remove the "Java" key and value associated with the key that is 1 .

So far so good , But the main question is how remove method removes key-value pair in the hashmap object .

Before moving onto the internal implementation of remove method of HashMap we need to understand the Entry object.

What is Entry Object

Map.Entry is the static nested class that stores the key/value pair that forms one element of HashMap.
Entry object stores in the bucket in the following way (hash,key,value,bucketindex)
The main point to note from the above line is that we need hashvalue and bucketindex besides key to get access to the desired Entry object in HashMap.


When you open the HashMap implementation  of the remove(key) method in Java Apis that is rt.jar , you will find the following code in it :

public class HashMap<K,V>
extends AbstractMap<K,V>
implements Map<K,V>, Cloneable, java.io.Serializable
{
// SOME CODE ,i.e Other methods in HashMap 

1. public V remove (Object key){
2. Entry<K,V> e = removeEntryForKey(key);
3. return (e==null ? null : e.value);
}
 
   // SOME CODE ,i.e Other methods in HashMap
 
}   


In the line 2 of remove(key) we are calling method removeEntryForKey(key). The main purpose of removeEntryForKey(key) method is it removes and returns the entry associated with the specified key in the HashMap. So let us understand how removeEntryForKey(key)  removes the entry object .

How remove method works in HashMap with Example


There are two possible scenarios for the key object ,

1. If key is not null
2. If key is null


Interviewer : How remove(key) method works internally in Java ?

As we know to find the desired Entry object which is to be removed in the HashMap we need hashValue , key and bucketindex . So remove(key) method calls  removeEntryForKey(key) method  internally , which calculate the final hashValue of the key object , and then use that hashValue in the indexFor(int,int) method to find the first entry object in the appropriate bucket. 
Since bucket(table) is a LinkedList effectively  , we start traversing from the first entry object which we got by using indexFor(int,int) method in the bucket. For each entry object in the bucket we compare whether  hashValue and the key is equal to the calculated hashValue in the first step and the key passed as a parameter in the remove(key) method.
If desired Entry object is found , then we removed that single entry object from the LinkedList.
Removing a single Entry object from the LinkedList is implemented just like removing a single object from the LinkedList.

Entry object returned by the removeEntryForKey(key) method is then  stored in the local variable e of type Entry in the remove(key) method.

If(e==null)
     return null
else
    return value of removed Entry object.


public class HashMap<K,V>
extends AbstractMap<K,V>
implements Map<K,V>, Cloneable, java.io.Serializable
{

   // SOME CODE ,i.e Other methods in HashMap 
 
 
    final Entry<K,V>  removeEntryForKey(Object key) {
 
   // Calculate hash value of the key passed as a parameter in remove method 
 
   1.   int hash = (key == null) ? 0 : hash(key. hashCode()); 
      
   // index for returns the first Entry in the appropriate bucket
   // Here , table is an array of Entry objects ,i.e.  Entry[] table
  
   2.   int i = indexFor(hash, table.length);
 
   // Below Code to remove a single object from the  simple LinkedList that is 
   // removing the desired Entry object from the LinkedList 
 
   3.     Entry<K,V> prev = table[i];
4. Entry<K,V> e = prev;
5. while (e != null) {
6. Entry<K,V> next = e.next;
Object k; 
  
  // If Entry object's key and hash value equal to the above hashvalue and key
 
   7.        if (e.hash == hash &&
((k = e.key) == key || (key != null && key.equals(k)))) {
8. modCount++; 
 
   // Reduce size of Entry[] table by 1
 
   9.              size--;
 
    // Remove the Entry object : Two case to remove 
   // Case 1 :  only single element in the bucket , then prev==e        
 
   10.             if (prev == e)
11. table[i] = next; 
  
   // Case 2 : if more than one element present in the bucket ,   
 
   12.             else
13. prev.next = next; 
 
   // recordRemoval() method is invoked whenever entry is removed from the table
 
   14.             e.recordRemoval(this);
15. return e;
}
16. prev = e;
17. e = next;
} 
   18.    return e;
} 


  }
 
     // SOME CODE ,i.e Other methods in HashMap 
}  


Interviewer : What is the purpose of calling recordRemoval() method in the removeEntryForKey(key)  since it is the concrete method without any body.

recordRemoval() method is a concrete method without any body. It is invoked whenever the Entry is removed from the table . Since LinkedHashMap extends HashMap , thus this method is overridden in the LinkedHashMap's Entry in order to maintain its linked list of entries.

Interviewer : What is the time complexity of  performing remove operation in HashMap using  remove(key)

Best Case time complexity of remove(key)  : O(1)  
Worst Case time complexity of remove(key) : O(n)

Interviewer: What happens if the null key is passed in the remove(key) method ?

The following lines will be executed in the removeEntryForKey(key) method

In line 1 , the value of hash will be 0 .
In line 2 , the value of indexFor will return 0 thus i=0.
In line 3 , Entry prev = table[0]
                Entry prev = null
In line 4,  Entry e = null
In line 5 , while loop condition returns false
In line 18 , return e (which is null)

thus null is returned to the remove(key) method , which will in turn return null. 

Interviewer : Explain the removeEntryForKey(key) method in HashMap in detail , considering key is not null?  


In the line 1 of removeEntryForKey(key),  if the key passed as a parameter is not null then , it will call hashfunction on the key object , so after key.hashCode() returns hashValue , so line 1 will look like
     int hash = hash (hashValue) 
we are now applying returned hashvalue into its own hashfunction. To defend against poor quality hash functions , we are calculating the hashValue again using hash(hashValue) in the above line.

We have hashValue and key , now we need to find the bucketindex of the desired Entry object

In line 2 , indexFor(int,int) , for the given hashValue, returns the first entry in the appropriate bucket.

So we get the first entry of the desired bucket.

In line 3 , we start traversing from the first entry in the bucket ,till we get the desired Entry object, prev is used to store the first entry in the bucket . Here table is an array of Entry objects i.e Entry[] table .

In line 4,  We created an Entry instance variable e which holds the prev value ,i.e, the first entry in the appropriate bucket.

Below Explanation is about removing a single object from the simple LinkedList that is removing the desired Entry object from the LinkedList

In line 5 , We iterate thorugh the Entry[] starting from the e ,till we get the desired Entry object
To check if we get the desired Entry object ,we need hashValue , key and bucketindex. We need to iterate through the bucket and its index one by one and comparing the hashValue and key of each Entry object.

In line 7  , If condition is true then we get the desired Entry object which we need to remove from the hashmap object .

Then two cases arises , whether bucket has single Entry object or it has more than one Entry object ,

If bucket has single Entry object , then,
       In line 10 , (prev==e) condition will be true
else bucket has more than one Entry object
       In line 12 else condition will be run

In line 14  , recordRemoval() method is called on the desired Entry object whenever the Entry is removed from the table.

In line 15 , the removed Entry object is returned to the remove(key) method.


Read Also :  How HashSet works internally in Java

If you still have any doubts regarding how remove method works internally in java then please mention in the comments.

Wednesday, March 18, 2015

Create New Maven Project In Eclipse For Selenium WebDriver + TestNG

Before creating maven project In eclipse IDE for selenium webdriver, You must be aware about maven and It should be Installed properly In your eclipse IDE. Earlier we learnt about what Is maven In THIS POST and how to download and Install maven In THIS POST. So If maven Is Installed In eclipse then you are ready to create new maven project as described In bellow given steps.


Steps to create new maven project

Step 1 : First of all, Open eclipse IDE and go for creating new project from New -> Other as shown In bellow Image.


It will open new project creation window.

Step 2 : Expand Maven folder In new project creation wizard window and select Maven Project and then click on Next button as shown In bellow Image.


It will take you to project name and location selection screen.

Step 3 : On  project name and location selection screen, You can choose work space location for maven project by clicking on browse button. If wants to use default work space location then select that check box and click on Next button as bellow.


It will take you to Archetype selection screen.

Steps 4 : On Archetype selection screen, Select Maven-archetype-quickstart option as bellow and click on Next button.


Step 5 : On next screen, Enter Group Id = STTA, Artifact Id = MavenProject and Package = STTA.MavenProject as shown In bellow Image. Then click on Finish button.


It will create new maven project In eclipse as bellow.


Now your maven project Is created. You can see there Is pom.cml file under your project as shown above.

Step 6 : Now you need to add selenium webdriver and TestNG dependencies with latest version In pom.xml file. Open pom.xml file and copy-paste bellow given code In It and then save It.

<project xmlns="http://maven.apache.org/POM/4.0.0" xmlns:xsi="http://www.w3.org/2001/XMLSchema-instance"
xsi:schemaLocation="http://maven.apache.org/POM/4.0.0 http://maven.apache.org/xsd/maven-4.0.0.xsd">
<modelVersion>4.0.0</modelVersion>

<groupId>STTA</groupId>
<artifactId>MavenProject</artifactId>
<version>0.0.1-SNAPSHOT</version>
<packaging>jar</packaging>

<name>MavenProject</name>
<url>http://maven.apache.org</url>

<properties>
<project.build.sourceEncoding>UTF-8</project.build.sourceEncoding>
</properties>
<dependencies>
<dependency>
<groupId>org.seleniumhq.selenium</groupId>
<artifactId>selenium-java</artifactId>
<version>2.44.0</version>
</dependency>
<dependency>
<groupId>org.testng</groupId>
<artifactId>testng</artifactId>
<version>6.8.8</version>
<scope>test</scope>
</dependency>
</dependencies>
</project>

Current latest version of selenium webdriver Is 2.44.0. TestNG latest version Is 6.8.8. You can change It If version updated version release In future.

Step 7 : Delete existing AppTest.java file from src/testjava folder package and create new class file under same package with name = WebDriverTest.java as bellow.


Now copy-paste bellow given code In that WebDriverTest.java file and save It.
package STTA.MavenProject;

import org.openqa.selenium.WebDriver;
import org.openqa.selenium.firefox.FirefoxDriver;
import org.testng.annotations.Test;

public class WebDriverTest {
WebDriver driver;

@Test
public void verifySearch() {
driver = new FirefoxDriver();
driver.get("http://only-testing-blog.blogspot.in/");
driver.quit();
}
}

Above file will show you errors as we do not have Included selenium and testng jar files In project's build path. Here maven will do It automatically for us.

When you save It, It will start building work space by downloading required jar files from maven central repository and store In local repository based on your selenium webdriver and TestNG versions as bellow. It can take 5 to 20 minutes based on your Internet speed.


Running webdriver project from pom.xml file
When above process get completed, You can run your project from pom.xml file. To run It, Right click on pom.xml file and select Run As -> Maven test as shown In bellow Image.


It will start executing webdriver test WebDriverTest.java file. This Is the way to create and run webdriver test In eclipse using maven and testng.

Tuesday, March 17, 2015

10 Books Every Programmer Should Read

There is saying that if you learn from your mistakes, you will only going to learn few things, but if you learn from other's mistake, you can learn lot of things in short time, and what could be better way to learn from someone's experience then reading books. Programming as a career is about constant learning and updating yourself, but unfortunately there is no right way to begin. School and Colleges are far behind when it comes to real world programming, and every computer science graduate is not lucky to work in a company which is great in training. Only viable option is to read book and follow advice from the great programmer and authors who are gone to that path. I still regret that why I didn't come to know about Clean Code when I started programming. These are the books which can change your career, can make you better programmer. These books are more about a way of thinking, organizing, and becoming better at the craft of software engineering. They won't make you better at any particular programming language e..g Java but they will help you to become a better Programmer.
Read more »

Monday, March 16, 2015

Selenium WebDriver Advanced Tutorials Part 6

This advanced tutorials of selenium webdriver software testing tool includes Maven Tutorials For Selenium WebDriver, Managing Cookies In software automation testing using Selenium WebDriver Test, HTMLUnit Driver/Headless Browser and PhantomJS GhostDriver tutorial.

Go with this steps by step software testing tutorials using selenium and learn it easily.

Maven Tutorials For Selenium WebDriver
  1. What Is Maven? Why Do We Use Maven In Selenium?
  2. How To Download And Install Maven In Eclipse Step By Step
  3. Create New Maven Project In Eclipse For Selenium WebDriver + TestNG
  4. How To Download And Install Apache Maven In Windows System
  5. How to Create New Maven Project From Command Prompt For Selenium
  6. How To Import Maven Project In Eclipse For Selenium Test
  7. Run Selenium Test In Maven Project From Command Prompt
Managing Cookies In Selenium WebDriver Software Test

How To Download And Install Maven In Eclipse Step By Step

We learnt what Is maven and why to use It In selenium project In previous post. Now Its time to Install maven In eclipse. Follow the steps as described bellow to Install Maven In Eclipse.

Prerequisites :
  • Java should be Installed and JAVA_HOME Environment variable should be set.READ THIS POST to know more on this.
  • Eclipse should be configured and Installed In your system. READ MORE on this page for more detail on how to Install eclipse.
Installing Maven In Eclipse

Step 1 : Open eclipse IDE and go to Help -> Install New Software menu as shown In bellow Image. It will open new software Installation window.


Step 2 : Add bellow given URL In Work with text field of eclipse and press keyboard ENTER button. It will search for maven software to Install.

URL = http://download.eclipse.org/technology/m2e/releases


Step 3 : On search completion, It will show "Maven Integration For Eclipse" check box as shown In bellow Image.


Select that check box and click on Next button as shown In above Image. It will start processing as bellow. It can take 1 to 2 minutes.


Step 4 : When above process completed, Install Remediation page will display as bellow. Click on Next On that screen.


Step 5 : Next screen will be Install Detail. Click on Next on It.


Step 6 : Next screen will be Review licenses. Select "I accept the terms of the licenses agreement." radio button and click on Finish.


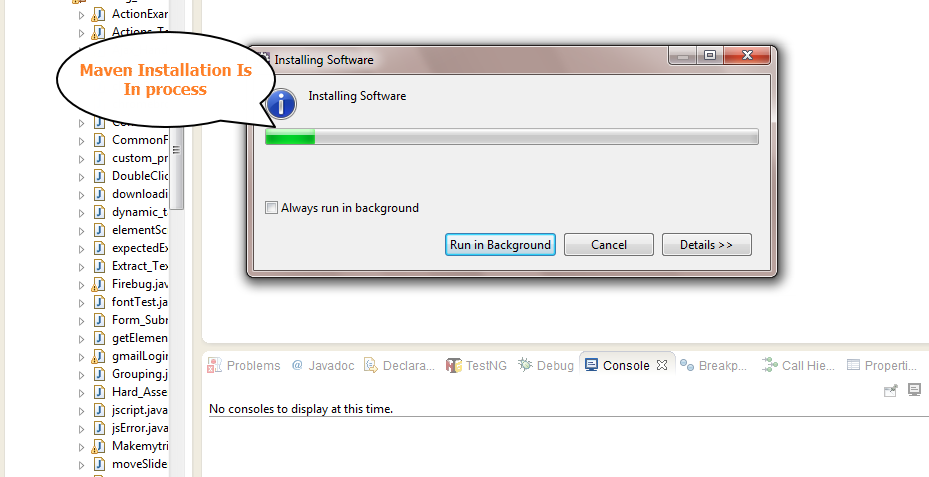
It will start Installing maven In eclipse as bellow and It can take 5 to 20 minutes to complete Installation. You can run It In background too.


Step 7 : At the end of maven Installation, It will show you message to restart eclipse. Click on Yes button as shown bellow. It will restart your eclipse.


How to confirm Maven Is Installed In your eclipse
To confirm that maven Is Installed properly or not In your eclipse, You need to open eclipse preferences window from menu Item -> Window -> preferences as bellow. It will show you Maven In tree as bellow on preferences window. It means maven Is Installed


You are done with maven Installation. read next post to know how to create new maven project In eclipse for selenium webdriver. If you wants to configure maven In windows then you can read THIS POST.